TS-9: Version Control
This technical standard covers the use of version control systems (VCS), also known as revision control, source control, or source code management (SCM) systems.
This standard defines an opinionated workflow for shepherding the source code of software systems through the lifecycle of development, testing, and release. This workflow is rooted in the principles of continuous integration and continuous delivery – pillars of modern software development practices.
- Introduction
- Objectives
- Repositories
- Commits
- Branches
- Releases
- Environments
- Branch-to-environment mapping
- Ephemeral preview environments
- Continuous integration and deployment
- Environment types and characteristics
- Environment configuration
- Testing strategy across environments
- Multiple version support
- Deployment strategies
- Example: Web application with continuous deployment
- Example: Library with release trains
- Example: Mobile app with multiple environments
- Integrations
- Long-term support
- Workflows
- Worktrees
- Git configuration
- PR config
- Continuous integration and delivery
- Security
- Miscellaneous guidelines
- References
Introduction
Git is unopinionated about how it is used. There are endless ways to organize repositories, record revisions, manage parallel branches of work, and handle integrations between them.
This flexibility comes with a cost. Git doesn’t impose any opinions, which means it provides no built-in constraints on how you use it. Yet constraints in how code repositories are used are necessary to avoid common pitfalls, like incompatible changes evolving in parallel branches, and regressions occurring through incorrect resolution to merge conflicts. Without constraints, code repositories can become the source of considerable friction in the software development process.
Git itself is fairly complex, with many features and many ways to combine them.
But you don’t need all of its features. A good workflow constrains how Git is
used to a small, well-defined set of operations, reducing mental overhead rather
than increasing it. Most contributors need only a handful of git commands and
a clear sense of when to use each.
Some popular workflows expose Git’s complexity unnecessarily.
GitFlow, for example,
requires contributors to track multiple long-lived branches (master,
develop), feature branches, release branches, hotfix branches, and support
branches, with rules for how each merges into the others. It is also brittle:
fixes that land on one branch must often be merged backwards into others, and it
is easy to forget a back-merge, leaving fixes stranded. The workflow described
in this standard deliberately avoids that overhead by keeping the number of
branch types small and their semantics clear, with changes flowing in only one
direction along the trunks.
Responsibility falls on software developers to design appropriate workflows and conventions for using Git, and for enforcing those workflows and conventions. We need to be very intentional in how we use Git, so that we can confidently deliver working software changes to production, reliably, consistently, and at an appropriate pace.
There’s lots to consider. The foundation for any version control workflow is a robust branching and merging strategy. On top of this baseline, we need to think about commit message conventions, versioning standards, releasing strategies, and how we can automate by plugging in to events in the version control system.
The optimum design for a version control workflow will vary between projects, but there are some common design patterns that have proven to work well in a wide variety of contexts.
This technical standard defines a version control workflow that’s rooted in established best practices. The workflow described here should not be treated as a rigid framework, but as a template to be adapted and extended as necessary to fit the particular requirements of each project.
The key principle is that a version control workflow should model the real-world software development process as closely as possible. Your version control workflow should be designed to support the way your development team actually works. Design and fine-tune your ways of working first, then, once your process is settled, model that process in your version control workflow. This approach supports the objective of simplicity and scalability: a lightweight, intuitive workflow can be incrementally extended as a project grows.
This standard is intentionally pluralistic. It accommodates a wide range of working styles — from continuous integration with direct commits to the trunk, through PR-based review workflows, to long-lived epic branches for coordinated big-bang integrations — rather than forcing teams into a single methodology. Where it recommends practices such as continuous integration, those describe what the workflows make cheap and natural, not what they require. Teams operating under stricter governance, with distributed contributors, or with complex coordination needs are first-class within the standard.
Version control systems
Git is the de facto industry standard for version control. This technical standard is written with Git as the assumed version control system, and examples and explanations are specific to Git’s capabilities and workflows.
However, the workflows described in this technical standard are portable to other decentralized version control systems such as Mercurial and Fossil, which share similar core concepts and abstractions.
Centralized version control systems, such as Subversion (SVN), operate under fundamentally different models and are not recommended by this technical standard. That said, there are legitimate use cases and organizational contexts in which centralized systems may be appropriate, such as enterprise environments with specific regulatory or compliance requirements, or organizations with substantial investment in specific VCS tooling.
Toolchains
This technical standard RECOMMENDS that version control be integrated with both issue tracking and CI/CD systems. Good integrations across all three systems make it substantially easier to manage and track changes in source code and configuration, and they enable a high degree of automation in the software delivery process.
Integrating version control with CI/CD pipelines is particularly valuable. It enables automated builds, tests, and deployments to be triggered directly by repository events such as commits, merges, and tags. This reduces manual overhead, accelerates feedback loops, and helps enforce quality gates before changes reach production.
All-in-one DevOps toolchains such as GitHub, GitLab, Azure DevOps, and Atlassian products provide deep integrations between version control, issue tracking, and CI/CD systems, while Fossil embeds bug tracking directly into the version control system itself. These integrated toolchains are RECOMMENDED for their ease of use.
This technical standard focuses on version control, not the toolchains integrated with it. Therefore, this technical standard documents the low-level Git commands for committing, branching, and integrating changes in source code. Many of these steps can be automated, but this is beyond the scope of this technical standard.
See also TS-8: Issue Tracking, which establishes a framework for issue tracking that is compatible with the version control conventions outlined in TS-9. TS-60: GitHub Actions covers best practices for working with GitHub’s integrated CI/CD tools.
Terminology
This technical standard uses railway metaphors in its explanations of version control branching-and-merging strategies.
Trunk lines are the never-ending main line tracks that represent the main
development path. Many Git workflows have just a single trunk line, which is
typically named main, master, develop, or trunk. But it is also
possible, as with railway systems, to have multiple trunk lines running parallel
to each other, with integration points along their routes where they are
synchronized. This is the pattern recommended in this technical standard.
Continuing the railway metaphor, branch lines are short-lived tracks that diverge briefly from the trunks before merging back later. In version control systems, branch lines are used for parallel development of software features, bug fixes, and configuration changes.
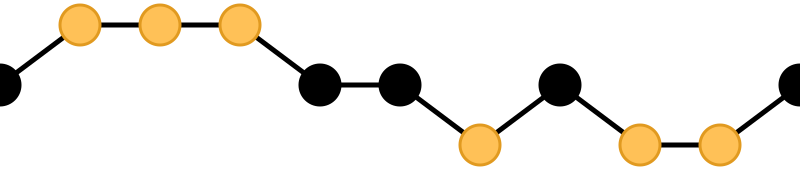
It is important to understand that, in Git’s implementation of version control, everything is a branch. Git does not distinguish between a trunk and a branch in its internal data structure. The concept of trunk lines is a convention, not a technical constraint enforced by the version control system.
Objectives
The version control workflow described in this technical standard is designed to meet the following objectives.
Simplicity and scalability
Software projects are more likely to be successful if the development process is robust. Robustness is achieved by keeping the process simple and intuitive. Good workflows can be repeated reliably with low likelihood of error.
In practical terms, this means that individual contributors need to know only a
small subset of git CLI commands, and they need to perform only a small number
of manual operations. Recurring processes are automated as much as possible.
Simplicity is the foundation for scalability. The same workflow should scale from a small hobby project to an enterprise application. The idea is that a simple, baseline workflow – perhaps one with just a single branch – can be incrementally extended with opt-in features and procedures, adding quality gates and automation as necessary to scale a project.
A concrete manifestation of this principle is strict uni-directional flow: revisions originate on the development trunk and propagate forward through testing and release, never backwards. Workflows that require fixes to be merged backwards (eg. hotfixes flowing back into prior release branches) are brittle — it is easy to forget a back-merge, leaving fixes stranded in one branch and missing from another. Forward-only flow eliminates that class of failure and reinforces the robustness that simplicity is meant to provide.
Multi-version support
The workflow MUST support the parallel maintenance of multiple major versions of a software component. This is essential for long-term support (LTS), where prior major releases continue to receive bug fixes and security patches alongside the current version.
A single-trunk model assumes monotonically incrementing versions (1.0.0 →
1.1.0 → 2.0.0 → 2.1.0) and is suitable for continuously-deployed services
where all users run the same version. Long-term support produces non-monotonic
sequences like 1.2.0 → 1.3.0 → 2.0.0 → 1.2.1 → 2.0.1, where patches to
legacy versions ship after newer major versions. The workflow MUST allow each
supported major version to flow through its own development → testing → ready →
release pipeline, independently of the others. See
TS-9: Version Control for the branch-naming conventions and
pipeline duplication that achieve this.
Continuous integration
The aim of version control is to enable individual developers to do their work in isolation, at their own pace, while still being able to integrate their changes into a shared codebase. A poor workflow can have the opposite effect — developers blocked waiting for commits from another developer, or waiting for merge conflicts on a shared branch to be resolved before they can integrate their own work.
The distributed nature of Git gives us the flexibility to check out and make different changes to the same files at the same time, but it introduces the risk of merge conflicts between diverging branches.
Merge conflicts can be time-consuming to resolve and they increase the likelihood of bugs and regressions reaching production. Centralized version control systems like Subversion (SVN) avoid this problem by allowing only one person to check out and work on a given set of files at a time. Distributed systems like Git and Mercurial better support parallel development, but they require additional operational overhead to coordinate parallel work streams and avoid merge conflicts and regressions.
The primary mechanism for managing this risk is continuous integration. The objective is for all work-in-progress to be integrated into shared trunk lines at regular intervals – ideally, at least once a day. This means that most branches should be short-lived, with limited exceptions such as proof-of-concept work.
Continuous delivery
It should be possible, at any time, to immediately deploy to production – or to production-like environments such as staging servers or canary channels – the latest stable revision of the software under version control.
Production deployments should be fast and highly automated. It should not be necessary to wait for builds to complete or tests to pass. This allows production services to be rebuilt quickly in response to incidents.
Safe continuous delivery depends on fast reproducibility of prior versions of the software. If an incident occurs in production after a release, it needs to be easy to roll back to the last known good version as quickly as possible, and with a high degree of confidence that the rollback will be successful. This process should be automated as much as reasonably possible. The alternative, to fix forward, always requires some degree of manual labor, and can therefore never be as well automated as rollbacks.
Fast rollbacks depend on prior versions maintaining stability indefinitely. In other words, it should be possible to recreate any prior version of a system, at any time.
Continuous deployment
Continuous deployment is an extension of continuous delivery, in which deployments to production environments are fully automated. If a continuous delivery pipeline passes, then the changes are automatically shipped. Failed deployments are automatically rolled back.
Continuous deployment is not appropriate for every software product, but where it is appropriate, the version control workflow needs to support frequent and fully automated deployments to production (or other production-like environments).
The aim is to avoid big-bang releases. Instead, a continuous deployment process ships many small changes. Regular production deployments reduce the risk of regressions and incidents, and make it easier to identify the root cause of issues that arise (because each change is small).
Quality control
Out-of-the-box, a version control workflow should be lightweight and as frictionless as possible. But the key to optimizing development velocity is to build in just enough friction to maintain stability in the evolving software. Development velocity will decrease if the quality of the system is allowed to degrade.
A version control workflow should be designed to maximize the utility of Git’s lightweight branching and merging operations, but also to allow quality gates to be added as appropriate for the domain. For example, static and runtime tests, and other automated quality checks that are fast to run, should be executed on every commit rather than delayed until integration.
Continuous integration, deployment, and delivery also add valuable feedback loops, which in turn help maintain code stability as the software evolves.
Automation
Version control workflows should be designed to support a high degree of automation of recurring development and operations procedures. Besides continuous integration and delivery processes, we should also be able to easily automate repetitive tasks such as the generation of release notes and changelogs, version number bumping, and the management of secrets and feature flags.
Automation is a key enabler of our ability to deliver software quickly and safely. It reduces the risk of human error and allows us to focus on the problem-solving and creative aspects of our work.
To optimize the potential for automation, sufficient metadata needs to be
embedded in commit objects, branches, and tags. In particular, the output from
git log should produce a clean and meaningful changelog, with clearly
signposted release points.
Provenance
The log output should be both human-readable and machine-parsable. Clean logs complement clean code. A clean codebase helps us understand the current state of a system, but this is only a snapshot in time. A clean commit log gives us visibility into a project’s history, and helps us understand the context in which the current code exists.
This brings us to the final objective, which is for every feature deployed to production to be traceable back to a business requirement, bug report, or incident that initiated the change. This can be achieved by tightly integrating the version control and issue tracking systems. If we enforce a strict two-way binding between tasks in the issue tracker and revisions logged in the version control system, we’ll be able to query Git for all changes related to a particular issue, and we’ll be able to query the issue tracking system for all requirements related to particular changes logged in a repository’s revision history.
Repositories
This section defines best practices for organizing, managing, and structuring code repositories within software projects. It covers repository cloning workflows, repository naming conventions, and repository scoping and boundaries.
Cloning workflows
For each code repository, there MUST be a single centralized instance that is the "source of truth" for the codebase. This is known as the reference repository.
For public open source software projects, some contributors will have read-only access to the reference repository. In this case, the external contributors must fork the reference repository to another Git server under their control, before cloning their fork to their local development environment. This is known as the fork-and-clone workflow.

The reference repository and its forks are collectively known as upstream repositories, because they are upstream to the local development environments where changes are implemented. The upstream repositories are hosted on central servers, usually managed by a specialist hosting provider such as GitHub or GitLab.
All contributors MUST implement changes in copies of the reference repository that are downloaded (cloned, in Git terminology) to their local development environments. These clones are called local repositories.

A local repository provides an isolated development environment, allowing multiple contributors to work in parallel.
Repository scope
The boundaries of code repositories SHOULD NOT be arbitrary. A repository is not merely a container for a random assortment of code. Rather, the boundaries of repositories SHOULD reflect the boundaries of software components – applications, services, or libraries.
A repository should encapsulate all relevant application code and configuration, tests, requirements specifications, technical documentation, user documentation, infrastructure configuration, and any other artifacts that are relevant to a discrete software component.
Within multi-team organizations, the boundaries of repositories should also map to the boundaries of responsibilities of the teams. Each repository SHOULD be owned by exactly one team. One team MAY own more than one repository, but all repositories under a single team’s ownership SHOULD be closely related (eg. fall under the same business subdomain or bounded context).
Self-contained repositories
A self-contained repository is one that encapsulates everything needed to build, run, test, and deploy a software component, without relying on external state or dependencies that are not themselves configured within the repository.
The goal is for developers to be able to check out a repository, run scripts stored in the repository, and quickly have a complete working application in an isolated development environment on the local host machine – all configured in the repository itself. This process should depend only on dependencies configured in the repository and installable automatically. This constraint supports the objectives of simplicity (developers need minimal setup) and continuous delivery (rapid reproducibility of prior versions).
In addition, developers SHOULD be able to check out any prior version from a repository’s history and be able to build, run, test, and deploy that version – without relying on any external dependencies that are not configured at the same version point in the same repository.
It is RECOMMENDED to offer a container image that encapsulates all required dev dependencies to lint, build, test, run, and deploy the application. This way the only dependency required on a developer’s host machine is a compatible container engine, like Docker. Devcontainers (https://containers.dev/) may be useful here.
If an application calls other external systems or services, it MUST be possible to operate the application without error when those external systems are unavailable. One possible solution involves having a "development mode" or "test mode", under which the running application uses fakes in place of external dependencies.
Production dependencies, such as third-party libraries and modules, SHOULD NOT be committed to version control. Bloating Git with vendor libraries and other binary artifacts slows clone operations and is poorly suited to Git’s strengths.
Instead, use a binary repository manager — such as JFrog Artifactory, Sonatype
Nexus, or AWS CodeArtifact — to host and proxy your dependencies. Combined with
package lock files (eg. package-lock.json, poetry.lock, Cargo.lock),
which pin exact versions and MUST be committed to version control, this approach
guarantees reproducible builds without bloating Git. Binary repository managers
also protect against upstream registries changing or disappearing — a real risk
for long-lived projects where reproducible historical builds is a requirement.
The constraint of self-contained repositories, together with lock files and a binary repository manager, helps to ensure the reproducibility of builds, which is necessary to support continuous deployment and automated rollback practices.
Mono-repos
Mono-repos MAY be used to encapsulate two or more related software components, and they are REQUIRED where two or more software components are so tightly coupled that they must always coexist – the components must be built, run, tested, and deployed together.
Keeping coupled components together in the same repo means that changes to one component can be easily made in the context of the other components that depend on it. This can help to manage breaking changes, and it maintains the principle of self-contained repositories.
For example, a mono-repo may be appropriate to manage the code and configuration for two or more tightly-coupled microservices. Even if those microservices are each independently deployed, if changes in code and configuration must be synchronized across the microservices, for example due to shared data stores or APIs, then those microservices SHOULD be maintained together in the same repository.
It SHOULD be possible to run a complete deployment operation from a single repository, without requiring coordination with other deployments from other repositories.
All components in a mono-repo SHOULD have the same version numbers. Within a repository, everything at the same revision SHOULD work together. This means that the repository itself can be tagged with release points, rather than these being captured in code and configuration within the repository’s contents, which would be necessary for multi-versioned components. Using repository-level versioning signifies the tight coupling between the software components maintained in the repository, and thus the need to version them together.
Repository naming conventions
A clear repository naming convention, standardized across teams and projects, makes it easier to:
- Quickly identify the purpose and content of a repository.
- Search and retrieve repositories more effectively.
- Share workflow automations (eg. CI/CD workflows could dynamically adjust based on a repository’s name).
It is RECOMMENDED to:
- Prefix repositories with the name of the team, subdomain, or project. Prefer to use codenames for this purpose.
- For repositories that are not scoped to any particular project or team, and
which are relevant to the whole organization, use a generic prefix like
common,shared, orglobal__, or the name of the organization itself. - In keeping with the principle of self-contained repositories, it is best
practice to encapsulate all code and configuration for a discrete software
component in a single repository. When this is not possible, use a consistent
repository name with a suffix to identify the individual subcomponents, eg.
--app,--db,--config,--docs,--infra,--lib,--test,--tool, etc. - If different versions of a software component are maintained in different
repositories, append a version identifier to the repository name, eg.
-legacy,-next. - Use lowercase US-ASCII letters only. Avoid including numbers and do not include special characters. Use hyphens to separate words in the repository name.
- Repository names SHOULD be short but descriptive of the domain of the software component. Do not reference the technology stack in the repository name. The technology stack is an implementation detail that can change over time, and it (usually) does not help to identify the contents of the repository. If you want to identify the technology stack, hosted repository services like GitHub and GitLab allow you to add descriptions, metadata, labels, tags, or topics to repositories.
<project>__<component>[-<version>][--<subcomponent>]
global__requests-for-comments
global__technical-standards
phoenix__http-api-v1
phoenix__http-api-next
phoenix__website--app
phoenix__website--db
phoenix__website--infra
titan__android-app
titan__ios-app
titan__ios-app-next
Tip
It is RECOMMENDED to use internal codenames to identify projects, products,
customers, or systems. The codenames will not need to change if a product name,
or some other external brand identity, changes. For example, a repository named
phoenix__website may encapsulate the source code for a website for a company
called "Initech", where "phoenix" is the internal codename for that customer.
The company can change its brand name and you won’t need to update extensive
code and configuration to reflect that change.
Preparing new repositories
To prepare new Git repositories, it is RECOMMENDED to first create the upstream reference repository. This is done via GitHub, or whatever Git hosting service is being used.
Next, clone the reference repository on your local machine. It is RECOMMENDED to use the SSH protocol, which has a stronger security profile than HTTPS. Example:
git clone git@<host>:/<team>/<repo>.git
Alternatively, create an empty directory on your computer, change to that empty directory, and then initialize a blank Git repository within it.
mkdir <repo>
cd <repo>
git init
When you directly git clone an upstream repository, Git assigns the identifier
"origin" to refer to the upstream repository from where the clone originated.
This doesn’t happen when you initialize a Git repository from scratch, so you
must run the following command to manually configure the location of the
upstream repository.
git remote add origin git@<host>:/<team>/<repo>.git
If you have followed the fork-and-clone workflow to contribute to an open source project, you SHOULD add a remote named "upstream" to point to the reference repository that is upstream from your fork repository ("origin"). You will need this if you want to keep your local clone synchronized with the project’s reference repository – the project’s source-of-truth.
git remote add upstream git@<host>:<team>/<repo>.git
Before you can set up the branches, you need to have some files to commit. Start by creating the project’s README.
touch README.adoc
echo "= [Project Title] >> README.adoc"
Now stage it.
git add README.adoc
And commit it.
git commit -m "chore: add readme"
When you commit the README file, Git creates a default branch called master or
main, depending on how Git is configured on your computer. According to the
branching conventions described later in this technical standard, it is
RECOMMENDED to use a default branch called dev (or latest/dev if multiple
versions of the software are supported in parallel). You can rename the current
branch using the git branch -m (move) command.
git branch -m dev
Push the new branch up to the origin repository. Use the --set-upstream
option, or its alias -u, to have the local dev branch track a branch of the
same name in the remote repository.
git push --set-upstream|-u origin dev
Since this is the first commit to the origin repository, the dev branch should
be automatically set as the default branch. You can verify this by inspecting
the repository settings in GitHub or GitLab.
These are the minimum requirements to prepare a new repository. Optionally,
additional branches can be created, as required. For example, to create the
test branch that is RECOMMENDED later in this technical standard:
git branch test
git checkout test
These two commands can be combined into one:
git checkout -b test
Alternatively, starting with Git 2.23, you can use the git switch command with
the --create or -c option:
git switch --create|-c test
Remember to push all the branches you create to the origin repository, setting up tracking with the remote repository.
git push --set-upstream|-u origin test
Use the git branch command to view all the local branches you have created.
Use the --all or -a option to view remote-tracked branches, too.
git branch --all|-a
.gitignore files
Every repository SHOULD include a .gitignore file that excludes editor and OS
metadata, build outputs, dependency directories, environment files, and any
other artefacts that should not be tracked.
gitignore.io provides curated
.gitignore templates for most languages, frameworks, and operating systems;
combine the relevant templates and adjust to the project’s needs.
Particular care SHOULD be taken to exclude files that may contain secrets —
.env, .env.local, credentials, key files. Even with secret-scanning hooks
(see TS-9: Version Control), .gitignore is the first line of defence
against accidental commits.
.gitattributes files
Every repository MUST include a .gitattributes file at the repository root.
This file tells Git what settings to automatically apply to specific file types
or paths — most importantly, line-ending normalization (see
TS-9: Version Control), but also whether a file type is treated as text or
binary, whether it should be excluded from archive exports, and whether it
should be tracked via Git LFS.
# Auto-detect text files and normalize line endings to Unix format,
# in both the remote repository and the local working directory.
* text=auto eol=lf

# Treat SVGs as text files. They are handled as assets
# (binary) by default.
*.svg text

# Process these files as assets (binary).
# Line endings will not be normalized.
*.eps binary
*.gif binary
*.ico binary
*.jpg binary
*.jpeg binary
*.png binary
*.tif binary
*.tiff binary

# Exclude these files and directories from zipped
# archives of the repository.
.editorconfig export-ignore
.gitattributes export-ignore
.gitignore export-ignore

# Use Git LFS to track these large files:
#path/to/file1.exe filter=lfs diff=lfs merge=lfs -text
#path/to/file2.exe filter=lfs diff=lfs merge=lfs -text
If the line-ending normalization rule is added to a project retrospectively, one
contributor MUST run git add --renormalize . from the repository root, and
commit and distribute the resulting changeset, to apply the new rule to all
files already under source control.
.editorconfig files
Every repository SHOULD include an .editorconfig file at the repository root.
EditorConfig is a standard for defining a baseline
code-editing configuration — charset, indentation, line endings, and similar
formatting concerns — that is shared via the repository and automatically picked
up by each contributor’s editor, via a plugin or native support. This keeps a
consistent coding style across contributors regardless of which editor or IDE
they use.
root = true                           # Place this file in the project root.

[*]                                   # Defaults:
charset = utf-8                       # - Files are UTF-8 encoded.
end_of_line = lf                      # - Files use Unix line endings.
indent_style = space                  # - Use spaces for indentation.
indent_size = 2                       # - Each indent should contain two spaces.
insert_final_newline = true           # - For VCS, end files with an empty line.
max_line_length = 120                 # - Lines should not exceed this length.
trim_trailing_whitespace = true       # - No whitespace on the end of lines.

[*.bat]                               # Windows Batch files:
end_of_line = crlf                    # - Require \r\n line endings.

[{Makefile,*.mk}]                     # Makefiles:
indent_style = tab                    # - Require tabs for indentation.

[*.md]                                # Markdown files:
trim_trailing_whitespace = false      # - Leave trailing whitespace.

[*.php]                               # PHP files:
indent_size = 4                       # - 4-space indents are conventional.

[*.py]                                # Python files:
indent_size = 4 # - 4-space indents are conventional.EditorConfig settles low-level formatting mechanics only. It does not replace language-specific style guides or linters/formatters (eg. ESLint, Prettier, Black), which enforce far more than EditorConfig is capable of — it is a complement to those tools, not a substitute.
AUTHORS files
Repositories SHOULD include an AUTHORS file (or AUTHORS.md) at the
repository root, listing the people who have contributed to the project. This
serves as a credit and attribution record, and gives new contributors and
external readers a quick view of who has shaped the project.
The file MAY be manually curated (often grouped by role, eg. "Maintainers" /
"Contributors") or auto-generated from git log (eg. via git shortlog -se in
a CI step). Some projects keep a separate MAINTAINERS file listing only the
people with active responsibility, distinct from the broader contributor history
in AUTHORS. Either convention is acceptable; the file’s purpose and update
policy SHOULD be clear from the file itself or the repository’s README.
AUTHORS is distinct from CODEOWNERS (see TS-9: Version Control):
AUTHORS is about credit and attribution, while CODEOWNERS is about review
routing and governance. A repository MAY have both.
Repository lifecycle
Repositories that are no longer maintained — projects that have been superseded, products that have been retired, or teams that have been dissolved — SHOULD be archived rather than deleted. Archiving (a feature of most hosting providers) freezes the repository’s contents and makes it read-only, preserving the source for historical reference, audit, and the rare case of needing to revive the project.
Before archiving, the README SHOULD be updated to explain why the project is no longer maintained, when it was archived, and where to find the successor (if any).
Repositories SHOULD be deleted only when there is a positive reason to do so — for example, the repository was created in error, or it contains data that must be removed for legal or regulatory reasons.
Commits
The following is a guide to the best practices for committing changes to a source code repository.
Clear and structured commit logs support multiple objectives:
- Automation, enabling tooling to parse and act on commit metadata.
- Quality control, through stable atomic commits that don’t break the build.
- Provenance, creating a machine-parsable changelog from which changes can be traced back to the requirements, issues, or incidents where they originated.
Besides these objectives, the output of git log is a valuable artifact in its
own right. Most crucially, it is the source-of-truth for understanding the
evolution of a codebase over time, and it is likely to endure for longer than
other artifacts such as tickets (issue trackers may be replaced) and decision
logs (which have a tendency to grow stale over time).
In short, good commit hygiene greatly contributes to the developer experience on a software project. Indeed, in this regard clean commits are just as important as clean code. So we SHOULD commit deliberately and strategically, with the same level of care and attention to detail as given to the code itself.
Atomic commits
A clean, searchable commit log is formed from atomic commits.
An atomic commit is a small, self-contained, incremental change to a codebase that does not break the build or fail any tests. An atomic commit does not necessarily represent a "complete" feature, bug fix, refactor, upgrade, or performance optimization, but it does represent a small, logical, stable step toward one of those outcomes.
Each commit is a minimal coherent idea.
– The Git project
When implementing changes, developers SHOULD commit one small change at a time. Large changes SHOULD be split into smaller, stable partial changes. Many small, discrete changes are preferred to a smaller number of large, monolithic changes.
As a general rule, the smaller the individual commits, the better. If your commits are too granular, you can squash them together. It is harder to do the opposite, to split a large commit into smaller ones.
But atomicity is not only about small commits. Atomic commits are also stable and self-contained.
Each commit SHOULD be stable. This means, in every commit, the software compiles and both static and runtime tests pass. This constraint means you should avoid adding revisions that "fix the tests that were broken in the previous commit".
The golden rule for every commit is: don’t break the build. It is RECOMMENDED to automate the build and test runs on every commit. Git hooks can be used to enable this.
Self-contained commits are those that can be reverted independently, without requiring prior commits to be reverted as well to maintain stability. This means changes to application code SHOULD be committed with changes to automated tests, just enough to verify the correctness of the code changes. If code and tests are committed independently, you have two or more commits that are dependent on one another. Those are not atomic commits.
Ideally, a commit SHOULD be scoped to a single concern and technology layer. For example, database schema changes SHOULD be committed separately from application code changes, and back-end service changes SHOULD be committed separately from front-end GUI changes, and so on. However, this constraint often comes into conflict with the constraint of keeping the build stable. Authors SHOULD prefer larger commits, with changes across multiple technology layers if necessary, if that is what is required to not break the build and keep the commit self-contained.
Achieving atomic commits requires a disciplined approach to implementing code changes. Atomic commits are easier to achieve when you have a plan for incremental implementation of the changes you need to make. For example, you might choose to take a bottom-up approach to the design of a feature, committing incremental changes, starting with low-level utility components, via higher-level abstractions, and finally exposing new functionality to the user.
Tip
Sometimes the need for a preparatory refactor only becomes apparent partway
through implementing a feature — you’re midway through a change and realize
the surrounding code should be restructured first. Don’t fold the refactor into
the commit you’re already building; that produces a non-atomic commit mixing
two unrelated concerns. Instead, run git stash to set aside your in-progress,
uncommitted changes, implement and commit the refactor on its own as a clean,
stable commit, then run git stash pop to restore your original work and
continue. This keeps the refactor and the feature work as two separate,
independently reviewable and revertible commits, even though the need for the
refactor only surfaced mid-task.
Atomic commits add cognitive overhead, but there are numerous advantages to the extra effort. Small, incremental changes are easier to understand during code review. They also make it easier to track the history of the codebase and to identify the purpose of each change. And small, incremental, stable changes can be regularly integrated into shared trunk lines, reducing the risk of integration conflicts ("merge hell"), and forming the basis for continuous integration, delivery, and deployment practices.
Stage changes deliberately. Avoid git add -A and git commit -a for routine
work — they assume that every local change is intended for the next commit,
which conflicts with the atomic-commit principle and makes it easy to bundle
unrelated changes (or accidentally stage build outputs, debug prints, or stray
edits). Prefer git add <path> for specific files, or git add -p to stage
individual hunks. A Git GUI that supports hunk-level staging serves the same
purpose.
Avoid combining a file rename with substantial edits to that file in the same
commit. Git relies on content similarity to detect renames; mixing rename and
edit can cause Git to show the change as a delete-plus-add rather than a rename,
which makes the diff harder to review and can break tools like
git log --follow that trace a file’s history through renames. Commit the
rename in one revision, then commit the edits in a separate revision.
Note that git mv does not affect rename detection — it is just a convenience
for mv && git rm && git add. Git detects renames from content similarity at
diff and log time, regardless of which commands were used to perform the move.
Rewriting history
Do not rewrite history that has been pushed to a shared branch. Rebasing, amending, squashing, or force-pushing a commit that other people may have pulled breaks references for everyone downstream — their local clones diverge silently, and recovering requires a coordinated reset. The fix-forward rule on trunks (see TS-9: Version Control) is one application of this principle.
The rule applies differently to different branch types:
- Trunks (
dev,test,ready, release branches): history MUST NOT be rewritten under any circumstances. Force-push MUST be disabled in repository configuration. - Temporary branches (
temp/*): owned by a single developer, so rewriting pushed history is technically safe. Cleanup via interactive rebase, amend, or squash before integration is RECOMMENDED to produce a clean, atomic series of commits. - Epic branches (
epic/): shared between multiple developers, so rewriting pushed history MUST be coordinated with all contributors. The merge-down sync strategy described in *TS-9: Version Control deliberately avoids the need for rebases on epic branches.
Revision types
To help enforce the constraint of atomic commits, each commit MUST be scoped to exactly one of the following eleven revision types:
- Behavior
- Quality
- Fix
- Step
- Refactor
- Style
- Maintenance
- Chore
- Release
- Merge
- Revert
A behavior is a change in a user-facing operation of the software. This name matches how TS-1: Software Requirements Specification labels functional requirements. Behavior revisions will typically toggle an externally-facing operation, such as enabling a new API endpoint. This type of revision covers changes and extensions to existing behaviors, and the deprecation and removal of old ones.
While behavior revisions capture the implementation of functional requirements, quality revisions capture the implementation of non-functional requirements. The commit type takes the same name TS-1 uses for this class of requirement ("qualities") because it concerns the system’s dynamic quality attributes — those that emerge at runtime and are observable externally — such as latency, throughput, availability, security, responsiveness, reliability, resilience, and so on. Performance in the strict sense (speed and capacity) is just one of these, not the whole of it.
Both behavior and quality revisions are user-facing changes. However, not all quality revisions will be observed by users in any kind of quantifiable way. For example, the implementation of more concurrent processing may reduce the operational costs for the software vendor, rather than reduce latency for users. The defining characteristic of quality revisions is that the change is observable and measurable externally of the system at runtime.
A fix is any change that resolves some sort of defect – whether a bug, regression, vulnerability, or incident. A fix could also silence entries in error logs that, on analysis, turn out not to be errors at all.
Behavior revisions, quality revisions, and fixes will typically be associated with tickets logged in the project’s requirements specification or issue tracking system. Many of these changes will be of interest to users and other stakeholders, and may therefore be recorded in user-facing artifacts such as release notes and changelogs.
The remaining commit types capture changes that are not directly user-facing and which are mostly of interest to the developers and maintainers of the software.
Typically, there would be a number of incremental changes to code and configuration before a behavior revision, quality revision, or fix is complete. These steps compose the building blocks for larger changes, or they explore possible design paths in an iterative fashion. Individually, these commits do not change user-facing operations or qualities of the software, but they do represent small increments toward such changes being enabled.
The necessity of step commits arises when implementing changes that are too large or complex to be completed as a single atomic commit. By breaking such work into a sequence of small, stable, and self-contained steps (atomic commits), we can achieve continuous integration into shared trunk lines, reducing the risk of merge conflicts and forming the basis for continuous delivery and deployment practices.
A refactor is any improvement to the design or internal structure of the code or configuration of the software, without changing the software’s behaviors or degrading its qualities. Refactoring work includes changes to automated tests and build scripts, as well as to source code and configuration, and the data structures and data flows, of the software itself.
A style commit applies presentation-only changes to code – updates to
whitespace, indentation, line wrapping, or code style. These changes affect the
appearance of the code without altering its structure, logic, or behavior.
Formatter runs (eg. prettier, black, gofmt) and bulk code-style
adjustments belong here, distinct from refactor commits, which restructure
logic, data, or design. Keeping pure reformatting in its own commit type also
makes it easier to filter such commits out when reviewing history with tools
like git log and git bisect.
Maintenance commits capture changes that are required in the upkeep of the software – to keep it in good running order. This category of work includes updating dependencies, improvements to automated tests, reconfiguring CI workflows and other tools, and extending documentation. Some maintenance tasks will typically be recurring, and they may be scheduled in advance (for example, using the issue tracking system) or triggered by external events (for example, a security scanning tool revealing a vulnerability in a dependency).
There also tends to be many small housekeeping chores around the maintenance of a code repository. Chores are small, insignificant maintenance tasks that are not important enough to be tracked via an issue tracker, whereas larger maintenance tasks normally are. Chores typically do not touch code or configuration, and so they will not even require peer review, and may therefore be committed directly to shared trunk lines, skipping the regular quality assurance gates.
Finally, a release commit captures a set of changes made in preparation of a new software release. The remaining two commit types, merge and revert, are required to capture specific Git operations.
Note
Some of these commit types map directly to issue types, as defined in
TS-8: Issue Tracking. For example, behavior commits
will typically be associated with "feature" issues, and fix commits will
typically be associated with "bug", "vulnerability", and "incident" issues.
However, these technical standards do not mandate a one-to-one mapping between
commit types and issue types. For example, a refactor commit may be associated
with a "refactor" issue, but equally it may be associated with a "feature"
issue, if the refactoring work is necessary to implement the feature.
Extended revision types
The revision types described above are suitable for code repositories that capture the code and configuration for software applications, services, and libraries, and also for things like infrastructure configuration, data migrations, and other executable artifacts.
But version control repositories are widely used for other kinds of non-executable artifacts, such as technical documentation, requirements specifications, and risk registers. For these repositories, the following set of revision types is RECOMMENDED:
- Create
- Update
- Delete
A create commit introduces new content – new documents, sections, or substantial new material that did not previously exist. An update commit makes edits to existing content. A delete commit removes outdated or redundant content that is no longer needed.
This extended set of commit types can be used in conjunction with the standard set. For example, style can be used to capture updates to markup and formatting.
Commit message format
To meet the objectives set out at the start of this technical standard, there must be precise rules for the formatting of commit messages.
The following commit message convention is loosely based on Conventional Commits, which in turn is based on the conventions of the Angular project.
Each commit message consists of a header, a body, and one or more footers. Each block is separated by a single empty line.
<header>

[<body>]

[<footers>]
Commit messages SHOULD be written in American English using only US-ASCII characters.
Commit message header
The <header>, also known as the subject line, is the only REQUIRED component
of a commit message. It functions like the subject line of an email message.
The header of a commit SHOULD convey just enough information for the reader to understand the contents of the commit object.
The header has a special format that includes a type and a description, separated by a colon and exactly one space.
<type>: <description>

[<body>]

[<footers>]
The <type> part MUST be one of the following words, which maps to the
different revision types listed above:
behaviorqualityfixsteprefactorstylemaintenancechorereleasemergerevert
Using predefined revision types as a prefix for commit messages makes it easy to
filter out unimportant changes (like chores) using git bisect. Separating
discrete development concerns – behavior delivery, bug fixes, quality revisions,
refactoring, etc. – into separate commit objects also helps to enforce the
principle of atomic commits.
The description part MUST be included, and it SHOULD be a short message that summarizes the change. This SHOULD be written in lowercase, with no period (full stop) or other punctuation to terminate the statement.
Generally, commits SHOULD NOT contain multiple distinct changes, but if they do, the descriptions of each change SHOULD be separated by a comma.
The objective is for the command git log --oneline – which only outputs the
header part of commit messages – to produce an easily readable, high-level view
of the sequence of incremental changes. Many Git UIs will also show only the
first line of the commit message.
In the following example, the chronological order of the commits runs from top-to-bottom:
$ git log --oneline
chore: initial commit, add readme
step: add openapi specification
fix: invalid yaml formatting
refactor: move openapi spec to resources directory
chore: proofread readme content
behavior: enable route to openapi spec
release: v0.0.0-beta
To improve the readability and usefulness of this output, commit headers SHOULD be written in the imperative mood in the present tense. This means writing commit messages as though you’re giving a current command or instruction. So you should write "change" not "changed" or "changes", and "update" not "updated" or "updates".
This written style is not intuitive at first, because you tend to write commit messages as a log of something that you have recently done (past tense). But it is better to think of a commit message as a description of the impact that applying the commit will have on the software under version control. Commits are not so much records of past actions as they are representations of states that can be checked out, merged, reverted, or cherry-picked at any time.
Consider the following two examples:
refactor: removed deprecated prefixes from vars✗refactor: remove deprecated prefixes from vars✓
The difference is subtle, but the second makes more sense in most contexts in
which a Git log is consumed. This style is also consistent with how Git itself
generates messages for operations like merge and revert – it writes "merge"
not "merged", and "revert" not "reverts", etc.
If written correctly, the <description> part of the commit message should
complete this sentence:
If applied, this commit will <description>.
Generally, the <description> SHOULD start with a verb describing the action
that is being taken by applying the commit. There are some exceptions. Bug fixes
need only describe the problem that is being fixed. And release commits can
simply give the version number of the release.
fix: invalid yaml formatting
release: v0.0.0-beta
Flags
The header line of a commit message MAY include an optional flag on the end. When included, the flag is demarcated from the description by a spaced hyphen:
<type>: <description> - <flag>
Flags are a single word, written in full capital letters, which MAY be one of the following:
BREAKINGINCOMPATWIPEXPERIMENTTEMPORARY
Additional flags MAY be added as required to support the workflow of a project.
The BREAKING flag MUST be used to signpost breaking changes that are introduced to the software. Example:
behavior: remove password from login endpoint - BREAKING
A breaking change is one that introduces a change to the interface that will be incompatible with existing client applications that interact with the system.
Breaking changes are mostly relevant in the context of systems that expose APIs. However, you could extend the principle to GUIs and other human-oriented user interfaces, too.
The rule is: if a change needs to be communicated with users of the software – whether those users are human or machine – via release notes or other such artifacts, so those users can continue to use the system effectively, then the change MUST be flagged as BREAKING.
Typically, the BREAKING flag will be most commonly applied to behavior revisions, but this is not a requirement.
The BREAKING flag MAY be used by automation tools to programmatically bump major version numbers (see TS-11: Versioning), and to automate the generation of release notes, changelogs, and other such artifacts.
While the BREAKING flag marks changes that are incompatible with external client applications, the INCOMPAT flag is used to mark internal breaking changes. An internal breaking change is, for example, a change to a function signature that requires changes to all calling code. Incompatible changes may also be done to data structures, database schema, message and event schema, and facades to dependencies and third-party systems.
step: remove third param of login action - INCOMPAT
In keeping with the principle of atomic commits, the necessary refactorings should be implemented in the same revision as the incompatible change, to keep the build stable. However, it is still useful to flag internal breaking changes. Other developers may be working on parallel changes that will break once their changes are integrated with yours, due to shared code and configuration. This is the purpose of the INCOMPAT flag – to draw the attention of other developers to changes you’ve made that may impact their own changes.
Where either of the BREAKING or INCOMPAT flags are included in the commit message header, use the message body to describe the change, the justification for breaking client or internal APIs, and the consequences of doing so. (See below for more information on writing commit message bodies.)
The WIP flag is used to signpost changes that are a work-in-progress.
Commits that "break the build" – ie. when static or runtime tests fail, or compilation fails – MUST be flagged as WIP.
WIP commits MUST NOT be pushed to the trunk lines (dev, test, ready). They
are permitted only on temporary or epic branches, and MUST be cleaned up
(rebased, squashed, or amended) before integration into dev. See
TS-9: Version Control.
In the following example, a WIP commit on a temporary or epic branch is followed by a stable one that completes the work (the chronological order is top-to-bottom).
refactor: rewire search algorithms - WIP
step: extend search algorithms
WIP commits serve a couple of purposes.
First, it is not always possible to implement a clean, stable change in a single atomic commit. Sometimes, no matter how disciplined you are in your committing practice, development tasks become necessarily messy. Including intermediate WIP commits (ideally via temporary branches, not shared trunks) provides a solution to keeping individual changes small while implementing large, destructive changes.
Second, WIP commits can be used to backup work that you started, but did not complete, before the end of a working day. You can commit your WIP to a temporary branch, push to the upstream reference repository for backup purposes, and then resume your work the following day.
Tip
If you end up with lots of changes in your working tree, which are not all
stable, you might still be able to make some stable commits from them, by using
git add -p to stage only some parts of changed files.
The EXPERIMENT flag MAY be used to signpost changes that are experimental.
Experimental changes are not intended to be permanent, and are expected to be
rolled back (eg. through git revert). Use cases for experimental commits
include testing a new library or trying alternative design patterns.
maintenance: test version bump of utils library - EXPERIMENT
revert: maintenance: test version bump of utils library - EXPERIMENT
Finally, the TEMPORARY flag MAY be used to signpost commits that are not
intended to be permanent, and which will be removed from the history before
integration with the dev branch.
The difference between a TEMPORARY commit and an EXPERIMENT commit is that the author fully intends to revert a temporary one, whereas an experiment may, in the end, be kept. A classic use case for temporary commits is to add debugging output to help investigate a problem. Once the problem is resolved, the temporary commit can be reverted, and the debugging output removed from the codebase.
maintenance: add more logging - TEMPORARY
revert: maintenance: add more logging - TEMPORARY
Header line length
The length of the header line – revision type, description, plus optional flag –
SHOULD NOT be more than 50 characters and MUST NOT be more than 72. (Only
merge and revert commits, which are automated, are excluded from this rule.)
The purpose of this constraint is to ensure that git log output is readable in
most contexts. If the header line is long, it may be truncated in printed
output. If you use Vim as your commit message editor, it already knows about 50
characters being the recommended soft limit for Git commit subject lines, which
is why the color changes after the 50th character by default.
Commit message body
The <body> component of a commit message is OPTIONAL. If included, the message
body is separated from the header by a single empty line (ie. two consecutive
line breaks).
<header>

[<body>]

[<footers>]
Important
It is important to ensure the message body is delimited from the message header
by a single blank line. Some Git operations, like rebase, can get confused if
the two run together.
The message body MAY be used to provide a longer description of the changes included in the commit, than can be included within the 50-character soft limit on the message header. Use the message body to explain how the new behavior differs from the old, if this cannot be fully understood from the message header on its own.
But the focus of the message body should be on recording the motivation for the changes, any contextual background information that is relevant, and why the changes were implemented the way they were, and whether other approaches were considered but rejected.
While the header line describes what changed (summarizing the commit’s diff), the commit body goes into detail about the why.
Use the message body to share any knowledge learnt through the lifecycle of the revision, that cannot be intuited from the changes to the artifacts under version control themselves. You might also consider including information about things that the code does not do, and why these things were omitted. Indeed, any information that may be relevant to the future maintainers of the code should be included in the message body.
Do not write redundant information in the message body that can be extracted from the commit object itself. For example, there is no reason to list the files that changed – that can already be deduced from the commit’s diff. The message body is for providing any other knowledge or context about the revision that would not otherwise be available, and which would risk being lost if not recorded with the revision.
The message body can be any freeform text. It should be written in full, proper sentences, terminated by periods (full stops). The body may consist of multiple paragraphs, delimited by single blank lines. Bullet lists (in Markdown style) MAY also be included, using hanging indents for wrapped lines – in fact, this is a great way to summarize the contents of the changeset:
step: improve robustness and flexibility of /realize prompt arguments

- Support multiple spec sources.
- Support `file://` URLs.
- Support Github shorthand, `owner/repo#42`.
- Other input argument hygiene.
The length of any individual line SHOULD NOT exceed 72 characters. This is
slightly longer than the RECOMMENDED maximum line length of the message header –
50 characters. It provides more practical space for writing out lengthy
descriptions, while still benefitting from good readability in terminal output.
For example, git log does not do any special formatting of commit messages.
The default pager is set to less -S, so long lines will simply flow off the
edge of the window. In a traditional 80-column terminal, if we subtract 4
columns for the left indent and 4 more for symmetry on the right, we are left
with 72 columns.
fix: prevent racing of requests

Introduce a request id and a reference to the latest request. Dismiss
incoming responses other than from latest request.

Remove timeouts which were previously used to mitigate the racing
issue but which are now obsolete.

Reviewed-by: Z
Refs: #123
Tip
Multi-line commit messages are not easy to input inline via the git commit
command. Instead, omit the --message|-m option from the commit command. Git
will open your default text editor, where you can easily write a full commit
message. Simply exit from the editor when you’ve finished making your changes,
and Git will complete the commit operation with the provided message.
Commit message footers
One or more footers MAY be included in commit messages.
The footers are a continuous block separated from the message body (or message header) by a single blank line. Individual footer entries within the block are delimited by a single line break.
A footer entry is a key-value pair written in the following format:
<key>: <value>
The key and value are separated by a colon and exactly one space.
The <key> is a string of contiguous characters, with words delimited by
hyphens. The key is case insensitive, so reviewed-by and REVIEWED-BY are
equivalent. Git itself uses message footers and its convention is to upper case
only the first word of the key: Reviewed-by. For consistency, it is
RECOMMENDED to follow this convention. But tools that operate on commit object
footers MUST implement case-insensitive parsing.
The <value> is any freeform text. Values are terminated by a single newline or
the end of the document, unless the next line is indented by at least one space
character, which denotes a continuation of the value from the previous line
(like the "folding" in RFC 822).
Keys do not need to be unique within a footer block. Multiple instances of the
same key, each with different values, MAY be included in a commit message’s
footers. Parsers MUST capture all the values in a list structure in the order in
which they appear in the footer. The
git interpret-trailers
command can be used to capture structured information from commit messages that
follow the conventions described here. (The format of Git trailers is inspired
by the encoding of headers in email messages, as defined in RFC 822.)
git interpret-trailers can also be used to customize default trailers, which
will be added automatically to all commit messages.
Closes: #123
Reviewed-by: Charlie <charlie@example.com>, Dave <dave@example.com>,
  Eve <eve@example.com>
Signed-off-by: Alice <alice@example.com>
Signed-off-by: Bob <bob@example.com>
Footers provide structured data used in automation. Therefore, you can specify whatever footers are required for each project’s tools.
Note
Some hosting providers (GitHub, GitLab, Bitbucket, etc.) automatically close
referenced issues when a commit containing a Closes: footer is merged to the
repository’s default branch. The exact set of recognised keywords varies by
provider — Closes, Fixes, and Resolves are widely supported, and most
providers also accept lowercase or alternate prefixes (closes, fix, etc.).
Consult your provider’s documentation. Self-hosted Git without an integrated
issue tracker does not provide this automation; in that environment, Closes:
is just a conventional footer with no automatic effect.
Closes: #123
Closes: #456
Repeat the footer key once per issue rather than listing multiple issue numbers
against a single key. Most providers' auto-close parsers match one issue
reference per keyword instance, so Closes: #123, #456 typically auto-closes
only the first issue; the second is left open even though it appears in the
same footer value. Since footer keys are not required to be unique (see
above), repeating Closes: for each issue is valid syntax and is the reliable
way to auto-close more than one issue from a single commit.
It is RECOMMENDED to cross-reference any issues or pull requests that are
relevant to the changes being implemented in a commit. If you do not want to
close the referenced issues automatically on integration of the changes, you can
use the Refs footer instead.
Refs: #123, #456
In all-in-one DevOps systems like GitHub and GitLab, this syntax creates a binding between issues and commits. In Git logs, the issue references will often be automatically linked to the relevant issue URLs. And vice versa: links will be automatically created from the issues to the relevant commits. This automation is incredibly useful.
If the issue tracking system is not integrated with the version control system in your upstream reference repository, you should instead use the full URLs to relevant issues.
This metadata is useful for finding the provenance of changes when auditing the history of a repository – for example, to understand the root cause of a bug that you’re working on fixing, or why some changes recently introduced to the project trunk conflict with your work. It will also allow you to query Git for any commits related to a particular issue or PR. Thus, these cross-references help to create a two-way binding between the issue tracking and version control systems.
Signed-off-by is another standard footer, which originated in the Linux Kernel
project and which is built-in to Git itself. It can be included by adding the
--signoff|-s option to the git commit operation:
git commit -s -m "fix: authorization error"
This will automatically add the Signed-off-by header with the value being
composed from the user.name and user.email fields in the Git config. This is
used in some open source software projects as a lightweight mechanism for
external contributors to opt-in to "sign" the terms of the
Developer Certificate of Origin (DCO), which
states that the author has the right to submit the changes and agreed for them
to be distributed under the terms of the project’s license.
Other footers that you may consider for your projects include:
Co-authored-byReviewed-byTested-by
Auto-generated commit messages
Git will automatically generate commit messages for operations such as merge
and rebase.
Merge commits
Merge commits are generated automatically by Git on certain git merge
operations. It is RECOMMENDED to use the --edit option to customize the
message of merge commits. (This is the default behavior since Git v1.7.10, so
the --edit option is no longer explicitly required. The raw git merge
command will open a text editor, unless a custom message is explicitly inputted
via the --message|-m option.)
git merge [--edit] <branch>
It is RECOMMENDED to edit the header line to conform with other committing conventions described in this technical standard. However, the default body of the message SHOULD be maintained. This is generated by Git and it contains useful information about the merge operation, including the hashes of all the commits integrated via the merge commit.
Note
As described in the section on integration strategies, merge commits SHOULD
generally be avoided in favor of fast-forward-only merging, which maintains a
clean linear history. However, if explicit merge commits are necessary (eg. for
integrations that require recording an integration point), prefer to specify the
type of changes being introduced from the source branch as the prefix – eg.
behavior:, refactor:, quality: – rather than a generic merge: prefix.
This makes the commit history more informative by indicating what kind of work
is being integrated via the merge commit.
Revert commits
If a commit reverts a previous commit, its header should be prefixed with
revert: `, followed by the original header quoted in double quotes. There
should be no body, and the footer should have a single `Reverts
header, as
shown in the example below, where <hash> is the SHA of the commit that is
being reverted.
revert: "refactor: move location of overlay component"

Reverts: d7o8k8l
As with git merge operations, Git generates a default message for revert
commits, so you will need to edit it on a case-by-case basis.
Commit message templates
It is RECOMMENDED to configure your local Git client to use a custom commit
message template, which will make it easier to follow the commit message
conventions when you use the git commit command (without the --message or
-m option) to create a new commit object.
Here’s how to configure a custom commit template and below is a template you can use. Be sure to include the empty line at the top – this is where the cursor will be placed when the user’s editor is opened.
<empty-line-here>
# <type>: <subject> - <flag>
# |<--------  maximum of 50 characters  -------->|

# <body>
# Provide a detailed description of this change. Wrap text over
# multiple lines as needed.
# |<------------   maximum line length of 72 characters   ------------>|

# <footer>
# Optional footers. Uncomment as needed.

#Refs: #<issue>
#Closes: #<issue>

# **********************************************************************
#
# <type> can be:
#   - chore        A insignificant change to non-production artifacts.
#   - behavior     A new/changed/removed user-facing operation.
#   - fix          A fix for a bug, error, regression, or incident.
#   - style        Low-level code formatting changes.
#   - maintenance  Dependency updates, tool configs, docs edits, etc.
#   - merge        An explicit merge commit.
#   - refactor     An improvement to the programs's internal design.
#   - release      Marks a new numbered version of the product.
#   - revert       Reverts an earlier commit.
#   - quality      A change to a dynamic quality attribute (latency, etc.).
#   - step         An increment toward implementing a larger change.
#
# <flag> can be:
#   - BREAKING     A breaking change to an external API.
#   - EXPERIMENT   A code experiment.
#   - INCOMPAT     Internal breaking API change.
#   - TEMPORARY    A temporary commit that will be reverted.
#   - WIP          Work-in-progress that breaks the build.
#
# Tips:
#   - Do not capitalize the subject line.
#   - Use the imperative mood in the subject line.
#   - Do not end the subject line with a period.
#   - Separate subject from body with a single blank line.
#   - Use the body to explain what and why, not how.
#   - Use "-" for bullet points in the body.
#
# **********************************************************************
Branches
Git supports many branching and merging strategies, including:
- Trunk-based development: All changes are committed directly to a single
perpetual trunk line. This branch is commonly called
main,master,develop, ortrunk. - Feature branching: Features, bug fixes, and other development tasks are undertaken in short-lived branches, known as feature branches or topic branches. Once the changes are stable and complete, they are integrated into the trunk line and the feature branch is deleted.
- Environment branching: Different deployment environments are built from
different branches, eg.
staging,production. Automated deployment pipelines are triggered by integrating changes into these branches. - Release branching: Versioned releases are cut from a stable branch, and the release is prepared in its own branch before being tagged with a release number.
Each of these branching strategies solves different problems, and they can be combined in various ways to model all sorts of development workflows. Elements of all these branching strategies are used in the workflow described in this technical standard, combined to support continuous integration, quality control, and scalability.
Branch types
This technical standard recommends seven main branch types:
Branch type | Naming convention | Purpose | Ownership | Lifespan | Protected* | Mutable | Stable | Requirement level |
|---|---|---|---|---|---|---|---|---|
Dev |
| Continuous atomic commits, integrations from temporary and epic branches | Team | Permanent | No | No | No | REQUIRED |
Test |
| Quality assurance | Team | Permanent | Yes | No | No | OPTIONAL |
Ready |
| Stable, production-grade artifacts | Team | Permanent | Yes | No | Yes | RECOMMENDED |
Release |
| Release-specific artifacts | Team | Permanent | Temporary | Yes | No | Yes | OPTIONAL |
Temporary |
| Short-lived feature development and bug fixes | Individuals and pairs | Temporary (short-lived) | No | Yes | No | OPTIONAL |
Epic |
| Long-lived complex feature development, big-bang integrations | Teams | Temporary (long-lived) | No | Yes | No | OPTIONAL |
Spike |
| Exploratory work: experiments, proofs-of-concept, technical spikes; never merged | Individuals and pairs | Temporary | No | Yes | No | OPTIONAL |
Note
A "protected" branch cannot be committed to directly. You can only fast-forward these branches to the tips of other branches.
In this workflow, the dev, test, and ready branches represent the trunk
lines. All three trunks share exactly the same linear commit history, though
much of the time they will have different commits at their tip. Revisions are
introduced first to dev and then flow through test to ready. This means
that dev is often a little ahead of test, and test ahead of ready.
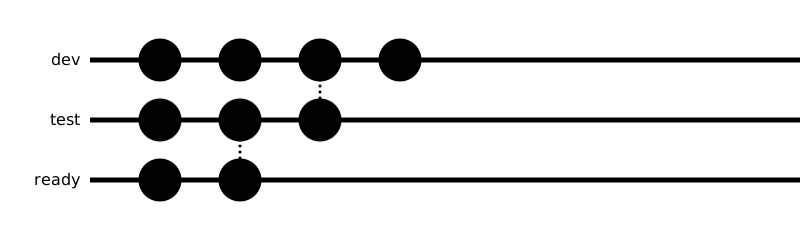
All three trunks – dev, test, and ready – have an infinite lifetime and
MUST NOT ever be deleted. Trunks MUST be treated as append-only stacks of
commits, always fixing forward. This means that commits made to the trunks MUST
be treated as immutable. Once a commit is made to a trunk, it MUST NOT be
dropped or amended – though it can be reverted through a git revert operation,
which safely adds a new commit without changing the original. These constraints
are necessary because the trunks are shared by all developers and used by
continuous integration and deployment pipelines and other automated processes.
Volatile shared branches disrupt collaborative workflows.
All commits originate on the development trunk. All working branches — temp/,
epic/, and spike/* — MUST be cut from dev. New work does not originate on
test, ready, or any release branch. Revisions are continuously integrated
into dev, either via direct commits to that branch, or via temporary or epic
branches that are subsequently integrated back.
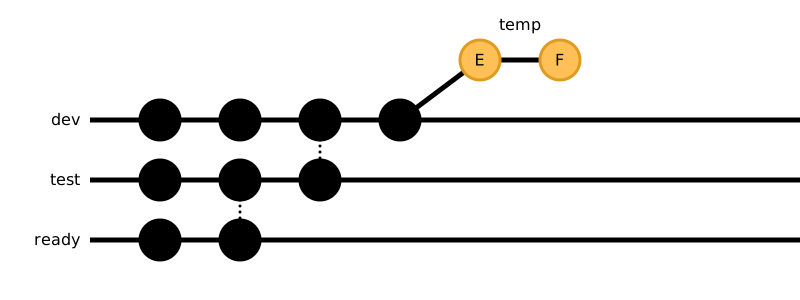
Revisions introduced via temporary branches are integrated back into dev when
they’re ready to be shared with other developers. The end result is as though
all the changes had been made directly to dev in the first place. This means
that the dev branch preserves a clean, linear commit history.
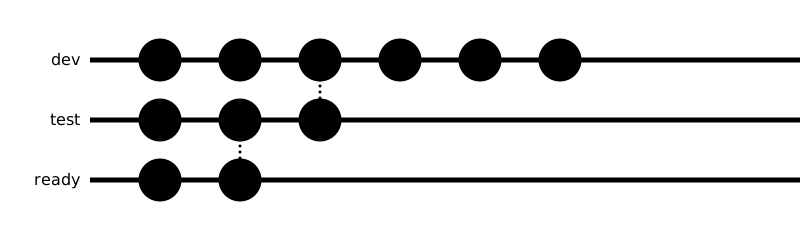
The dev branch is the first of the three trunks to be updated with the latest
revisions to the software. Fast quality control checks, such as unit tests, are
periodically run on dev. The test trunk is fast-forwarded to stable commits
on dev. Then more extensive, longer-running quality assurance checks are
undertaken against the new tip of the test trunk. Finally, when all tests
pass, the ready trunk is fast-forwarded to the passing commits on the test
trunk.
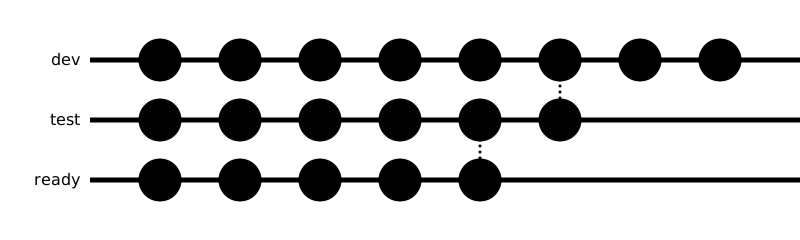
All three trunk lines share the same linear commit history. There are no
explicit merges between the trunks. What differs between the trunks is the
stability of the commits at their tip. While the tip of dev may not always be
stable, the tip of the ready trunk is guaranteed to always capture
production-grade artifacts from which release candidates can be cut at any time.
The ready trunk is literally ready for release to production environments,
directly supporting the objective of continuous delivery.
An alternative way to visualize this workflow, rather than seeing the three
trunks as parallel lines, is to think of them as a single mainline track, where
dev, test, and ready are trains that have stopped at different stations
along the track. dev is always the HEAD of the mainline track. It is always
ahead of test, and test is always ahead of ready.

Another mental model is to think of dev, test, and ready as fixed-position
stations, and the commits are a flow of trains running along the track that
connects the stations. Commits originate at dev, pass through test, and
journey on to ready and beyond. It’s a continuous flow. Commits may be get
backed up between stations, and not all commits stop at every station.

The single track visualization is a more accurate representation of Git’s lightweight branching model, where a branch is merely a reference to a commit.
Releases are cut from the ready trunk via either a single long-lived release
trunk (supporting continuous deployment) or multiple short-lived
release/<version> branches (supporting release trains). This is covered in
more detail in the section on release strategies.
The trunk names are chosen to be intuitive. They indicate the stage of the
software development and release cycle that the tip commits in each trunk have
reached. There is no master or main branch, because these words do not have
any correlation to stages of the software development lifecycle. Does the tip of
a main branch always hold production-grade code, or does it represent the
latest increment of the software, including unstable and untested changes? The
answer is it varies from one project to another. In this workflow, the trunk
branches are named to be unambiguous about the stage of the software lifecycle
that they represent: dev → test → ready → release. The semantics of this
workflow’s trunks and branches will not change from one project to another.
The development trunk
The only REQUIRED branch in this workflow is the dev branch, the
integration branch where all in-progress development work is brought together.
It is equivalent to the develop branch in the legacy GitFlow workflow, and to
the single main branch in trunk-based development. For this reason, it is
RECOMMENDED that the dev trunk be configured as the default branch in
reference repositories.
Note that Git itself has no concept of a default branch; this is a feature added
by hosting services such as GitHub and GitLab, which use the configured default
as the target for pull/merge requests and as the branch checked out by
git clone without further arguments.
Note
Although dev is the simplest name for the development trunk, it is RECOMMENDED
that even projects with a single delivery pipeline prefix their trunks and
branches with latest/ from the outset — so the default branch is latest/dev
rather than dev. This costs almost nothing up front and reserves the option to
develop a future major version in parallel with the current one (for example,
during a big-bang rewrite) without renaming the established trunks. Parallel
development of two versions of a single application is occasionally desirable in
every kind of software, not just in formal long-term-support scenarios. The
latest/ prefix and its alternatives are described in
TS-9: Version Control.
In almost all cases, the starting point for new development work will be the
latest HEAD commit on the dev trunk. The HEAD of dev represents the very
latest iteration of the software, which may include many changes not yet
released.
The objective is to integrate changes into dev as soon as possible — ideally
multiple times per day, per developer. Frequent integration keeps every
contributor’s working copy close to the latest revision, which dramatically
reduces the chance and severity of merge conflicts. The longer a branch diverges
from dev, the more likely it is to need painful conflict resolution at
integration time.
This technical standard encourages a continuous integration workflow, in which
stable, atomic commits are committed directly to the dev trunk. Alternatively,
temporary branches may be cut from dev, with changes committed to those
temporary branches before being integrated back into dev. However, the end
result SHOULD be as though all changes had been committed to dev directly.
Tests SHOULD be run against the dev trunk – but not necessarily the full test
suite. The focus should be on providing fast feedback on the latest increments
of development. In many cases, it will be sufficient to run basic linting and
unit tests, and perhaps other fast quality checks. Integration tests, system
tests, performance tests, and other expensive or long-running checks SHOULD be
performed subsequently against the test trunk.
All tests that run against dev SHOULD pass on every commit. The objective is
for work on the dev trunk to be reasonably stable, though not necessarily
complete. The dev trunk is actively used by other developers, so if you push
something to the dev trunk that is not yet tested or that breaks the build,
you are breaking the social contract with the rest of your development team.
But mistakes will happen. Particularly in continuous integration workflows,
occasional instability may show up in a project’s dev trunk. When tests fail
on dev, resolve them quickly by pushing new fixes to it (fixing forward).
Temporary branches
Continuous integration directly on the shared dev trunk is RECOMMENDED for
most work. However, there will be times when it is beneficial to keep your work
isolated from parallel changes being introduced by other developers. Temporary
branches are reserved for short-lived feature development and bug fixes.
Exploratory work that you do not intend to integrate — experiments,
proofs-of-concept, and technical spikes — belongs on a spike branch (see
below) instead. Valid use cases for temporary branches include:
- Major refactoring or rewrites — Large structural changes that may take multiple days and require extensive testing before integration.
- Disruptive work — Changes that significantly affect the codebase and would cause issues for other developers if integrated prematurely.
- Long-running features — Features that cannot be completed and tested within a single day, where intermediate commits would break the build.
- Work-in-progress backup — Pushing incomplete work to a temporary branch at the end of the day as a remote backup.
- Open source contributions — Contributing to projects where you do not have write privileges on the reference repository.
In all these cases, temporary branches MUST be cut from dev (never from
test, ready, or any release branch) to keep your work isolated while it
develops.
Temporary branches are the equivalent of feature branches (also known as task branches or topic branches) seen in other workflows. They are so-named in this workflow to emphasize the fact that temporary branches SHOULD be short-lived. Best practice is to err on the side of continuous integration rather than long-lived branch lines. Integrating all changes regularly helps to avoid merge conflicts.
Temporary branches SHOULD be ephemeral. Once the changes in a temporary branch
are integrated into the dev trunk, the temporary branch SHOULD be deleted.
This keeps the repository tidy and prevents confusion about which branches are
active and which are not. The commit history of the temporary branch will still
be preserved in the dev trunk, so there is no loss of information in the
commit history when temporary branches are deleted after integration. The result
is a clean, linear commit history on the dev trunk, as though everything had
been committed directly there in the first place, with all revisions originating
in the dev trunk.
Note
A branch is nothing more than a ref: a named pointer to a commit, stored as a
file under .git/refs/heads/. Deleting a branch removes only that pointer — it
never touches the commit objects it referenced. A commit is only eligible for
removal from the object database once it becomes unreachable from every branch,
tag, and other ref in the repository. Because the temporary branch’s commits
were fast-forwarded (or merged) into dev before the branch was deleted, they
remain reachable from the dev ref and so are retained indefinitely, exactly as
though the temporary branch still existed.
Genuinely unreachable objects are eventually cleaned up by git gc.
A useful visual model for thinking about the role that temporary branches play
in the version control workflow is to imagine the dev trunk as a continuous,
winding main track that incorporates changes from the temporary side branches
along its route. Multiple developers work on parallel side branches that rejoin
the main track as they complete, their commits flowing into the trunk as if they
had always been part of the main line.
Temporary branches SHOULD follow this naming convention:
temp/[<id>-]<description>
The component parts of the temporary branch name are as follows:
<id>(OPTIONAL) — A unique identifier for the temporary branch, usually corresponding to an issue number or some other identifier in a system where the work is being tracked.<description>(REQUIRED) — A short hyphen-delimited description of the change introduced in the branch.
Note
The <description> segment MUST comply with Git’s ref-name rules: it MUST NOT
contain a space, tilde (~), caret (^), colon (:), question mark (?),
asterisk (*), square bracket ([), backslash (\), or two consecutive dots
(..); it MUST NOT begin or end with a slash or a dot; and it MUST NOT end
with .lock. Git rejects branch names that violate these constraints outright
— see git-check-ref-format(1). Beyond what Git enforces, <description>
SHOULD use lowercase letters and hyphens only (no underscores or camelCase),
and SHOULD be kept short enough to remain readable in terminal output and CI
logs — as a guideline, under 50 characters, excluding the <id>- prefix. These
same rules apply to the <description> segment of epic and spike branch names
(see below).
Examples:
temp/42-add-search-endpointtemp/178-fix-auth-timeouttemp/TS-504-migrate-user-schema
The detailed mechanics of branch ownership sit somewhat outside the scope of these technical standards. They will vary depending on the team’s development methodology (eg. solo, pair, or mob programming) and the capabilities of the issue tracking system in use. The basic principle is that each temporary branch SHOULD have clear ownership, and that ownership SHOULD be kept in sync with the assignment of the associated issue in the issue tracker (see TS-8: Issue Tracking). When responsibility for an issue transfers between team members, ownership of the associated temporary branch transfers accordingly.
When a temporary branch attracts pushes from multiple independent contributors
(as distinct from pair or mob programming, where multiple people share
authorship of the same commits), this is often a sign that the work has not been
well decomposed into smaller, independently-integrable changes. Where multiple
contributors are needed to deliver a feature, prefer breaking the work into
smaller temporary branches owned by individual contributors, each integrating
into dev as it completes. If the work genuinely cannot be decomposed — for
example, cross-cutting refactoring or large coordinated features — use an
epic branch (see below) rather than a multi-contributor temporary branch.
Each temporary branch SHOULD be scoped to a single, focused change — typically one issue. Multiple orthogonal changes (eg. a feature plus an unrelated refactor) MUST NOT be combined into a single temporary branch, even if they touch overlapping files. Splitting them keeps reviews focused and integrations clean.
Epic branches
While temporary branches are designed to be short-lived, there are scenarios
where a team needs a long-lived branch to coordinate complex, big-bang
integrations. Epic branches serve this purpose. They are also temporary
(eventually deleted), but persist for weeks or months rather than days, and are
typically worked on by multiple developers or teams. Like temporary branches,
epic branches MUST be cut from dev.
Valid use cases for epic branches include:
- Large coordinated features — Complex features with multiple components that span weeks or months and are developed by different team members.
- Major refactoring initiatives — Large structural changes that require time to implement and cannot be broken down into smaller, independently-releasable increments.
- Cross-cutting concerns — Changes affecting multiple systems or layers that need to be coordinated across teams.
- Release preparation — Stabilization and preparation work before a major release, where fixes may need to be applied across multiple systems.
The key difference between epic branches and temporary branches is the
synchronization strategy. Temporary branches are short-lived and use a rebase-up
strategy: you keep the temporary branch synchronized with dev by rebasing the
temporary branch onto dev. This produces a linear history and keeps the
temporary branch lightweight and easy to integrate.
Epic branches, by contrast, use a merge-down strategy: you synchronize the epic
branch with dev by merging dev into the epic branch. This creates
explicit merge commits that preserve the epic branch’s lineage as a distinct,
long-lived development line. The merge-down strategy is safer for long-lived
branches because it never rewrites shared history—multiple developers can safely
push to the epic branch without fear of conflicting history rewrites.
When you eventually integrate the epic branch back into dev, you will have a
single, cohesive commit (or small number of commits) that represents all of the
epic’s work. This differs from how temporary branches integrate, where the
individual commits from the temporary branch are preserved in `dev’s history.
Epic branches follow this naming convention:
epic/[<id>-]<description>
The component parts are the same as for temporary branches:
<id>(OPTIONAL) — A unique identifier, usually corresponding to an issue or epic tracking system.<description>(REQUIRED) — A short hyphen-delimited description of the epic.
Examples:
epic/billing-v2-rewriteepic/PRODUCT-187-auth-overhaulepic/infra-migrate-kubernetes
Epic branches SHOULD eventually be deleted once the work is integrated into
dev, just like temporary branches. The merged commit history is preserved in
`dev’s history, so no information is lost.
Spike branches
Temporary and epic branches both exist to develop changes that will ultimately
be integrated into dev. Spike branches serve the opposite purpose: they
isolate exploratory work that is never intended to be merged. A spike is a
time-boxed investigation whose deliverable is knowledge, not shippable code.
Valid use cases for spike branches include:
- Experimentation — Trying multiple possible solutions before committing to a final implementation.
- Proof-of-concept — Validating an architectural approach or technology choice before full implementation.
- Technical spikes — Exploring unknown territory or researching solutions to unfamiliar problems.
Because the code produced on a spike branch is throwaway, a spike is considered
complete when its findings have been captured somewhere durable — an issue, a
design document, an architecture decision record, or a follow-up temp/ or
epic/ branch that implements the chosen approach properly. The value of a
spike lives in what you learned, not in the commits themselves.
Like temporary and epic branches, spike branches MUST be cut from dev. Unlike
them, spike branches MUST NOT be integrated back into dev (or any other
trunk). This is the defining characteristic of the spike branch type: its
commits never reach a trunk line. If you find that you want to keep the code,
the spike has served its purpose — start a fresh temp/ or epic/ branch and
reimplement the work to the standard required for integration, rather than
merging the exploratory commits.
Spike branches follow this naming convention:
spike/[<id>-]<description>
The component parts are the same as for temporary and epic branches:
<id>(OPTIONAL) — A unique identifier, usually corresponding to an issue or tracking system.<description>(REQUIRED) — A short hyphen-delimited description of the question being explored.
Examples:
spike/can-we-use-websocketsspike/512-evaluate-graphqlspike/PERF-88-caching-strategies
Because spike branches are never merged, there are two acceptable end states, and the choice is left to the team:
- Delete the branch once its learnings have been captured elsewhere. This is the tidier default and keeps the branch list focused on active, integrable work.
- Retain the branch as an archived record of the experiment. This can be
useful when the exploratory code itself has reference value. Retained spike
branches SHOULD be clearly distinguishable as archived (for example, via the
spike/prefix alone, or hosting-provider archiving features) so they are not mistaken for work awaiting integration.
Cleaning up stale branches
Beyond the routine deletion of branches after integration, projects SHOULD
periodically review long-lived temp/ and epic/ branches that have not been
integrated. Stale, never-integrated branches obscure the signal that the branch
list is meant to provide — namely, what work is currently in progress.
A branch with no commits in (eg.) 90 days SHOULD be reviewed and either revived or deleted. Stale-branch cleanup MAY be automated via hosting-provider features or external tooling.
Intentionally retained spike/* branches (see above) are an exception: because
they are archived records rather than work awaiting integration, they SHOULD be
excluded from stale-branch sweeps. Spike branches that were not deliberately
retained, however, SHOULD be deleted once their findings have been captured, and
are fair game for the same periodic review.
The testing trunk
The test branch, known as the testing trunk, is a permanent, protected branch
used for quality assurance. It is RECOMMENDED for projects that require
comprehensive testing before release.
The test trunk is fast-forwarded to the latest stable commits on the dev
trunk. Once a commit reaches test, more extensive and longer-running quality
assurance checks are undertaken against that commit. These checks may include
integration tests, system tests, performance tests, and more expensive static
analysis that would be impractical to run on every commit to dev. The test
trunk may also be deployed to a testing environment for manual testing and final
validation before promotion to ready. Alternatively, you might create a
separate trunk (eg. uat for user acceptance testing) dedicated to manual
testing in a staging environment.
All tests that run against test SHOULD pass before the corresponding commit is
promoted further. When all tests pass, the ready trunk (ready) can be
fast-forwarded to the same passing commit on test.
No commits – not even hotfixes – are made directly on the test trunk. All
changes MUST originate in dev, pass quality assurance on test, and then
propagate to ready. This ensures that every commit reaching ready has been
thoroughly validated. The goal is for revisions to flow quickly through the
trunks with as much automation as possible, so that any issues discovered in
production can be rapidly fixed on dev and promoted through the pipeline.
Important
Trunk lines MUST always be fixed forward. All changes to code and
configuration MUST originate on the dev branch and propagate forward through
test, ready, and release. If a problem is discovered in any downstream
trunk — for example, QA checks failing on test, or an incident traced to a
commit already on ready or release — the fix MUST NOT be committed to that
trunk directly. Instead, it MUST be committed to dev and flow forward through
the pipeline like any other change. Not even hotfixes are an exception.
The way to make this practical is to automate the promotion steps between dev
and ready and release, so that fix-forward is fast.
The "hotfix" pattern common in workflows like GitFlow — where urgent fixes
bypass the QA pipeline, are committed directly to release branches, and then
back-merged to development — is forbidden for several reasons. A hotfix that
skips the pipeline is by definition untested in the environments where bugs are
normally caught, and a one-line urgent fix can introduce regressions as readily
as any other change, often more so because it is written under pressure. Direct
commits to downstream trunks also create divergence that requires either a
back-merge (which this standard forbids) or a duplicate fix re-implemented on
dev, producing competing versions of the same change. And once a team
tolerates "emergency" exceptions, the bar for what counts as an emergency drifts
lower over time. The correct response to "the pipeline is too slow for hotfixes"
is to make the pipeline fast, not to bypass it.
If you don’t have any expensive or long-running validation tasks, the test
trunk MAY be dropped from the workflow. Instead, the ready trunk can be
fast-forwarded directly to stable commits on the dev trunk. This is a simpler
workflow. It will provide perfectly suitable quality controls for simple
software components, like small libraries.
Likewise, you MAY choose to have multiple testing trunks, each representing a
different aspect of your quality assurance process. For example, you could have
a perf branch that deploys to an isolated environment where load and stress
testing is undertaken, and a uat branch that deploys to a staging environment,
which is used for final manual testing before changes are promoted to the ready
trunk. For more details on mapping branches to deployment environments.
Smoke tests SHOULD be run early in the testing pipeline. Usually, these will be
done on the dev trunk, along with linting and unit tests. However, if your
build is resource-intensive or long-running, you may offload this to a smoke
trunk, which sits between dev and test in the pipeline.
Design your branching strategy to fit the quality assurance requirements of your project. The principle is to have one branch per environment that you need to deploy to for different quality control processes.
The ready trunk
The ready trunk is a permanent, protected branch designed to be pristine:
every commit on ready MUST have passed all the quality assurance checks
earlier in the pipeline, and the trunk MUST NOT carry unverified or in-progress
work. The same pristine standard applies to the release trunk and any release
branches downstream of ready (see TS-9: Version Control); they inherit
their cleanliness from ready and MUST NOT receive direct commits either.
The pristine quality is the reason for the multi-stage quality-assurance flow
that runs ahead of ready. Revisions originate on dev, pass fast checks
there, fast-forward to test for longer-running and more expensive validation,
and only fast-forward to ready once all checks pass. By the time a commit
lands on ready, the team can be confident that it is shippable.
The tip of ready always references the most recent iteration of the software
that has been proven to be stable and production-grade. This does not
necessarily mean the changes have been deployed or released in production, only
that they could be at any time. In other words, the tip of this branch could
become a release candidate.
The ready trunk is fast-forwarded to commits on the test trunk only when
those changes have proven to be stable via the testing workflow.
The purpose of the ready trunk is to give us a single trunk line with an
immutable commit history that is always in a shippable state – enabling
continuous delivery.
The ready trunk is OPTIONAL. For some software projects, it will be perfectly
adequate to run all tests against, and to cut releases from, the dev trunk or
the test trunk. However, for any non-trivial software system, it is
RECOMMENDED to have a ready trunk. This allows you to have a clear separation
between the latest increments of development (dev), stuff that’s still going
through QA (test), and the stable, production-grade code (ready).
If you don’t have any expensive or long-running tests, the test trunk can be
dropped and ready can be synced directly with dev.
No commits – not even hotfixes – are made directly on the ready trunk. The
purpose of this constraint is to ensure the ready branch is always stable and
deployable, by not circumventing the usual quality assurance checks. All changes
must originate in the dev trunk, pass validation on the test trunk, and then
propagate to ready.
Releases
The release process — promoting stable code to production and delivering it to users — varies significantly depending on the context in which software is made and delivered. This standard accommodates that flexibility by decoupling the development process from the release process.
This standard REQUIRES continuous delivery, which means that every change is automatically built, tested, and prepared for release as part of the normal development workflow. However, continuous delivery does not mandate continuous deployment. You may choose to release small increments frequently, or to bundle multiple changes into infrequent release trains. The choice of release cadence is flexible, but the ability to release at any time is a core objective.
Every commit on ready is a candidate for release, but deployment is not
mandatory — you choose the release strategy and cadence.
The choice of release cadence (big bang, release trains, or continuous deployment) and rollout strategy (rolling, canary, blue/green, feature flags) is covered in detail in TS-10: Releasing. This section of TS-9 focuses on the version-control mechanics that support those choices.
Release workflows
To support all release cadences, this technical standard RECOMMENDS two different processes for managing releases via version control systems:
- A release trunk workflow supports continuous deployment.
- A release branch workflow supports release trains and big bangs.
In both workflows, releases are cut from stable revisions on the ready trunk
line. What differs is how and when those releases are made.
Release trunks
A perpetual release trunk supports continuous deployment. Every change that
passes automated verification on ready is automatically built, tested, and
promoted to the release trunk for immediate deployment to production.
The release trunk has the same chronology of commits as the other trunk lines,
but is usually some steps behind the tip of the ready trunk.
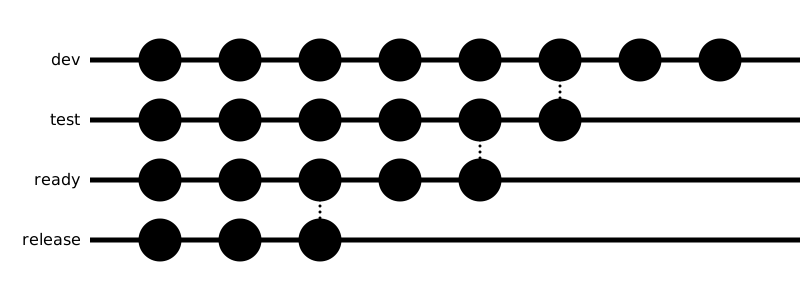
The release trunk references compiled artifacts stored in an external artifact
repository (registry, object storage, etc.), indexed by commit SHA or tag. The
key constraint: you must be able to deploy the latest revision immediately,
without waiting for builds to complete or tests to rerun. This enables rapid
incident response — for example, rolling back to a previous revision in
production by redeploying an older build from the artifact repository.
Release branches
An alternative strategy is to cut temporary release branches, one per release,
from various points along the ready trunk. The release branches are versioned
– release/<version>. If the version number is not yet decided at the time the
branch is cut (for example, when QA findings may reclassify the release as major
rather than minor), a placeholder name such as release/next MAY be used; the
eventual tag carries the final version.
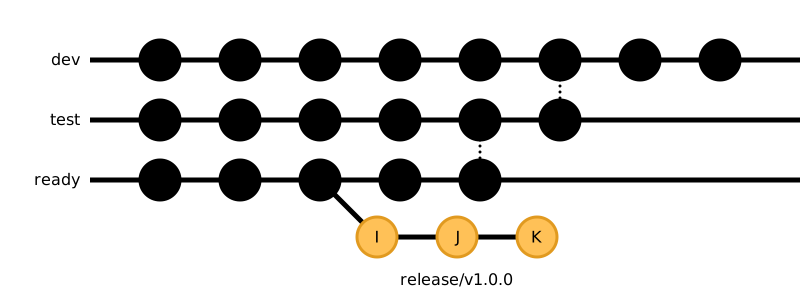
Release branches support release trains, big bang releases, and other discrete
versioned releases. A release branch is created for each discrete release, eg.
release/1.2.0, release/2.0.0. It is where that version is tagged, its
changelog is defined, and any version-specific fixes are made.
A key benefit of cutting release branches from ready is that release
preparation does NOT block ongoing development. While the release branch is
being stabilised and tagged, dev continues to receive commits for the release
after that. Release-time code freezes are not needed — the trunk-based model
decouples release preparation from continued development. (Operational freezes
for other reasons, such as high-traffic commercial events or holiday windows,
are still appropriate; see TS-10: Releasing.)
Each release branch captures release metadata — including release notes, version
tags, changelogs, and configuration (like secrets or feature flag states) —
specific to that version. These do not need to merge back to the trunk lines.
Ideally, the build system auto-generates this metadata in delivery pipelines,
using source metadata from the ready branch (commit messages, git logs, source
annotations).
The release branch itself is temporary. It is created to prepare a release and is deleted after the version is tagged and released. However, the release tags are permanent — they remain in the repository to reference the source code at the point of each release. Compiled artifacts (binaries, packages, container images) are stored in external artifact repositories, indexed by version tag.
The release branch workflow follows these steps:
- Create a release branch from the current tip of the
readytrunk. Name it with the version number:git checkout -b release/<version> ready - Prepare release metadata on the release branch: update version numbers, generate or finalize release notes and changelogs, and configure any release-specific settings (feature flags, secrets, etc.).
- Verify the release through final validation: run the full test suite, build the release artifacts, and perform any final checks required before deployment.
- Once verified, tag the release with the version:
git tag -a v<version>(or however your versioning scheme dictates), then push the tag to the remote:git push origin v<version>. Neither a plaingit pushnor the branch push in the next step transmits tags — annotated tags are local-only until pushed explicitly, whether by name (as above), withgit push --follow-tags(pushes annotated tags reachable from the commits being pushed), or withgit push --tags(pushes every tag in the local repository). Omitting this step leaves the release tagged locally but absent from the remote, which breaks any automation or teammate workflow that resolves the release by tag. - Build and store compiled artifacts in an external artifact repository (container registry, package repository, object storage, etc.), indexed by the version tag.
- Delete the release branch:
git branch -D release/<version>andgit push origin --delete release/<version>. The version tag remains permanently in the repository. - Development continues on the
readytrunk for the next release. If there are additional fixes needed for the current version, they flow back throughdevand are promoted toreadylike any other changes.
If release preparation fails — for example, tests fail, an artifact build is
broken, or the wrong version number is committed — abandon the release branch
and start over. Code or configuration fixes MUST NOT be committed to release
branches; release branches MUST contain only release-preparation commits
(version bumps, changelog updates, release-specific configuration). Fixes flow
through dev and ready like any other change, and once the underlying issue
is resolved on the trunk, a fresh release branch is cut. This preserves the
fix-forward discipline established for the trunk lines and keeps release
branches focused on a single responsibility.
Artifact repositories
This standard distinguishes between two kinds of release artifacts:
- Compiled artifacts — Binaries, packages, container images, and other build outputs. These MUST NOT be stored in version control.
- Release metadata — Version tags, changelogs, release notes, configuration (secrets, feature flags). This can be stored in version control via release branches.
Git is optimized for source code, not binaries. Storing compiled artifacts in Git repositories significantly slows clone operations, bloats the repository size, and complicates merges. For this reason, compiled artifacts MUST NOT be stored in version control.
Anti-patterns to avoid:
- Git Large File System (LFS) — While useful for source-controlled media (images, videos), it is not suitable for release artifacts. It still ties artifacts to the repository, slowing operations and complicating distribution.
- Orphaned branches — Using dedicated branches to store only build artifacts pollutes the repository history and does not solve the fundamental problems above.
Instead, store built artifacts in dedicated systems external to version control, eg.:
- Registries — eg. Docker Hub, Amazon ECR, Maven Central, npm, PyPI, etc. — for containerized apps and libraries.
- Object storage — eg. Amazon S3, Google Cloud Storage, Azure Blob — for binaries, archives, and generic build outputs.
- Generic artifact repositories — eg. JFrog Artifactory, AWS CodeArtifact, Sonatype Nexus — for any artifact type.
Best practice is to create a two-way binding between version control and
external artifact repositories using version numbering. For example, if v1.2.3
is a tag in the repository, v1.2.3 in the artifact repository refers to the
compiled artifact built from the source code at the v1.2.3 tag. This enables
traceability and reproducible deployments.
Environments
The version control workflow described in this technical standard separates the concerns of development, testing, and release. To operationalize this workflow, each branch type should map to corresponding deployment environments where the software runs. This mapping enables automated testing and validation at each stage of the development lifecycle, and supports the objectives of continuous delivery and quality control.
Branch-to-environment mapping
Each branch type can be mapped to a deployment environment where the software is built, tested, and validated:
- Local development (
devbranch, temporary branches) — Developer machines, local containers, or cloud-based development environments - Development integration (
devbranch) — Shared development environment where the latest increments are deployed automatically - Testing (
testbranch, optionalperf,smokebranches) — Isolated testing environments where quality assurance checks are run - Staging/Pre-production (
readybranch) — Production-like environment used for final validation before release - Production (
releasebranch) — Live environment serving end users or customers
The specific environments you implement depend on your project type, team size, risk tolerance, and available infrastructure. Minimal setups might have just local development and production; larger projects might have development, testing, staging, and production environments, plus additional specialized environments for performance testing, user acceptance testing, or canary deployments.
Ephemeral preview environments
In addition to the long-lived trunk-based environments described above, modern CI/CD platforms support ephemeral preview environments — short-lived deployments that are automatically provisioned on push to a temporary branch (or on opening a PR) and destroyed when the branch merges or is deleted. Each active branch or PR gets its own isolated, fully-running instance of the application that reviewers and stakeholders can interact with before the change is integrated.
Preview environments are particularly valuable for:
- UI and UX review — Designers, product managers, and other non-technical stakeholders can interact with a proposed change in a real browser, without checking out the code or running it locally.
- Cross-team coordination — Downstream consumers (mobile clients, partner integrations, dependent services) can validate against a real instance of the change before it merges.
- Deployment validation — Issues with build configuration, infrastructure-as-code changes, environment variable handling, or migration scripts surface in the preview environment rather than in production. This catches a class of bug that unit and integration tests cannot.
- Manual exploratory testing — QA can probe a change interactively without competing with other in-progress work on the shared development integration environment.
Common implementations include:
- Hosted PaaS platforms — Vercel, Netlify, Render, Cloudflare Pages, and similar services typically provide preview deployments out of the box, indexed by PR number or branch name.
- Per-PR Kubernetes namespaces — Self-hosted setups can use ArgoCD ApplicationSets, Argo Rollouts, or custom CI workflows (GitHub Actions, GitLab CI, etc.) to spin up a namespace per PR or per branch.
- Database branching — Services like Neon, PlanetScale, and Supabase support per-branch database copies that pair naturally with per-branch application deployments, so each preview gets its own isolated data layer.
Preview environments complement, but do not replace, the trunk-based environments. They give fast, interactive feedback on individual changes; the trunk environments validate the integrated state of the codebase across all merged work. Both layers are needed: a preview tells you that your change works in isolation, but only the integration environment can detect conflicts between your change and other parallel work.
Operational considerations:
- Resource cost — A long-running PR with many revisions can keep an environment alive for weeks. Configure automatic teardown on inactivity, and budget infrastructure capacity for the expected number of concurrent previews.
- Data privacy — Preview environments SHOULD use synthetic, anonymized, or scrubbed data, never copies of real production data. Where production-like data is required, the same constraints that apply to staging environments apply here.
- Secret handling — Preview environments MUST use environment-scoped secrets, not production secrets. Most CI/CD platforms support this via environment-specific secret stores; treat it as a hard requirement.
- Public exposure — Preview URLs are often guessable or indexed. Either gate them behind authentication (the platform’s built-in protection or a reverse proxy) or assume any URL is effectively public and design preview content accordingly.
Continuous integration and deployment
Continuous integration systems (GitHub Actions, GitLab CI, Jenkins, etc.) plugged into the reference repository SHOULD be configured to automatically build, test, and deploy the software whenever commits reach each branch. This automation is the mechanism that drives the workflow:
- When code is committed to
dev, CI builds and runs fast checks (linting, unit tests) on a development integration environment. - When the
testbranch is updated, CI runs more comprehensive tests on a testing environment. - When the
readybranch is updated, CI may deploy to a staging environment for final validation. - When code is tagged for release, CI builds and stores release artifacts indexed by version tag, ready for production deployment.
Automated deployment SHOULD include immediate feedback: if tests fail, CI notifies developers so issues can be fixed quickly. If all checks pass, the software is promoted to the next environment automatically.
Environment types and characteristics
Different environments serve different purposes and have different characteristics:
Development environment — Used by developers for active coding and testing. This environment should be: - Easy to set up and tear down - Disposable (developers should feel free to destroy and rebuild it) - Isolated from other developers' work - Compatible with local development tools and IDEs - Configured with development versions of dependencies (not production secrets or data)
Development integration environment — A shared environment where the latest
dev branch is automatically deployed. Used for:
- Running automated quality checks across the full codebase
- Detecting integration issues between parallel work streams
- Early feedback on the impact of changes
- Often short-lived or frequently reset
Testing environment — An isolated environment used for quality assurance. Should be: - As similar as possible to production (same OS, database, runtime versions) - Configured with test data rather than real user data - Capable of handling long-running tests without impacting developers - Able to be reset between test cycles without affecting development
Staging/Pre-production environment — A production-like environment used for final validation. Characteristics: - Identical infrastructure and configuration to production - Contains sanitized or anonymized copies of production data (if data is needed) - Used for final manual testing and validation - Serves as a "canary" to catch issues before they reach production - May be used to validate deployments, rollback procedures, or disaster recovery
Production environment — The live environment serving end users. Constraints: - High availability and reliability requirements - Strict access controls and audit logging - Limited testing (should not break user experience) - Automated and reversible deployments - Monitoring and alerting to detect issues quickly
Environment configuration
Environment-specific configuration (database URLs, API endpoints, secrets, feature flags, resource limits, etc.) SHOULD NOT be committed to version control. Instead:
- Use environment variables, configuration files, or secrets management systems to inject configuration at runtime
- Store secrets (API keys, passwords, credentials) in dedicated secrets management systems (HashiCorp Vault, AWS Secrets Manager, etc.)
- Use feature flags (toggles) to enable/disable features per environment without code changes
- Keep infrastructure-as-code (Terraform, CloudFormation, etc.) in version control, but separate from application code
This separation ensures that code can be promoted through environments without modification, supporting reproducible, automated deployments.
As with secrets, it is RECOMMENDED to manage feature flags through a dedicated external service (eg. LaunchDarkly, Split, Unleash) rather than a homegrown mechanism, once a project has more than a handful of flags. A dedicated service externalizes flag state from the deployment pipeline entirely — flags can be scheduled, targeted at a percentage or segment of traffic, and toggled instantly without a deploy — and typically provides approval workflows and metrics integration so a flag’s impact can be observed before a wider rollout. Homegrown flag systems tend to accrete into unmaintained bespoke infrastructure; this is rarely a good use of engineering effort compared to adopting an existing tool.
Testing strategy across environments
The testing pyramid should be inverted across environments:
- Local and dev environments — Developers run fast checks locally (linting, unit tests, basic integration tests)
- Dev integration environment — Automated fast checks run on every commit to
dev - Testing environment — Longer-running tests (integration, system, performance
tests) run on
testbranch updates - Staging environment — Final validation (user acceptance testing, smoke tests, deployment validation) before production
- Production — Minimal testing (health checks, synthetic monitoring) to avoid disrupting users
This approach balances feedback speed (developers get fast feedback) with thoroughness (more comprehensive tests run on stable branches before release).
Multiple version support
For projects that maintain multiple major versions in parallel (LTS support), create a corresponding set of environments for each supported version:
latest/dev→ Latest development environmentv2/dev→ v2 development environmentv1/dev→ v1 development environment
Each version stream flows through its own set of testing and staging
environments to release, allowing independent testing and deployment of each
version. This requires parallel CI/CD pipelines, one per version stream.
Deployment strategies
The branch-to-environment mapping described above supports a range of deployment strategies (big bang, blue/green, canary, rolling, feature flags). The choice of strategy is covered in TS-10: Releasing.
Example: Web application with continuous deployment
A typical web application with continuous deployment might use:
- Local dev — Developer machine, Docker containers
- Dev integration — Kubernetes namespace or cloud VM, auto-deployed from
devbranch - Testing — Kubernetes namespace with test database, auto-deployed from
testbranch - Staging — Kubernetes namespace with production-like configuration,
auto-deployed from
readybranch - Production — Kubernetes cluster with multiple replicas, auto-deployed and load-balanced
Each environment is automatically updated whenever its corresponding branch changes, providing immediate feedback and validation.
Example: Library with release trains
A library that uses release trains (discrete versioned releases) might use:
- Local dev — Developer machine
- Testing — CI system runs tests on every commit to
test - Staging — Manual deployment of
readybranch for final review - Production — GitHub/npm releases created from
release/<version>tags
Environments are minimal because there’s no "live" software to deploy—the deliverable is a packaged artifact (npm package, jar file, etc.) that users install themselves.
Example: Mobile app with multiple environments
A mobile application supporting LTS might use:
- Local dev — Developer machine, iOS simulator/Android emulator
- Dev integration — Internal test flight / beta channel
- Testing — QA team uses beta builds before release
- Staging — Final validation in test flight before App Store release
- Latest version in App Store — Latest major version available to users
- Legacy versions — Previous major versions still available to users
The latest/ and version-specific branches (v2/, v1/*) each have their
own release pipeline, allowing independent updates to older versions.
Integrations
In collaborative development, multiple contributors work on separate branches, each implementing independent features or fixes. Eventually, these changes must be brought back together, by reintegrating them into shared trunk lines.
There are multiple ways to do this, and each option has its own advantages and disadvantages.
Integration strategies
Git supports several strategies for taking changes committed to one branch (a source branch) and integrating those changes into another branch (a target branch). Broadly, the options are:
- Fast-forward merging
- Explicit merging
- Squash-merging
- Rebasing
- Cherry-picking
- Patching
Each integration strategy has its own strengths and trade-offs. Choosing the right integration strategy is crucial to maintaining a clean, navigable commit history that serves as a useful changelog for the project while also reflecting the development workflow of the team. This document describes the available strategies and provides recommendations for their use.
First, let us look at merging. Git supports three distinct merge behaviors: fast-forward merging, explicit merging, and squash-merging.
Fast-forward merging
When merging changes from a source branch into a target branch, if there is no divergent work in the target branch, Git’s default merge behavior is to fast-forward the tip of the target branch to the tip of the source branch. No merge commit is recorded. If the source branch is later deleted, no trace of it will be left in the history. The end state will be a clean, linear history of commits, in chronological order, as if all the commits had been implemented directly on the target branch in the first place.
The below animation demonstrates this workflow. "A" and "B" are initial commits
on a branch named target. A new branch, named source, is created from commit
"B". Commits "C", "D", and "E" are subsequently introduced to the source branch.
The source branch is then merged into the target branch:
git checkout <target-branch>
git merge <source-branch>
Because there are no new commits on the target branch, Git will handle the merge by simply fast-forwarding the target branch to the tip of the source branch, which is commit "E". The end result is both branches referencing the same commit. Therefore, both branches have identical commit histories.
Finally, the source branch is deleted, leaving no trace of its existence.

Note
This behavior is equivalent to using the --ff flag. However, since it is the
default behavior of git merge, the flag can be omitted in most cases.
The fast-forward merge integration strategy has numerous advantages. It preserves the history of commits in their true chronological order, and the end result is a clean, linear history. It is also a very fast and reliable operation. Fast-forward merging never requires resolution of merge conflicts.
Fast-forwarding is the default behavior of the git merge command. If a merge
cannot be fast-forwarded, an explicit merge commit will be recorded instead.
Alternatively, you can tell Git to fail a merge operation if fast-forwarding is
not possible. You do this by supplying the --ff-only (fast-forward-only) flag:
git checkout <target-branch>
git merge --ff-only <source-branch>
Explicit merging
In busy projects, it is common for new commits to be introduced to the target branch that do not exist in the history of the source branch. In this situation, Git cannot simply fast-forward the tip of the target branch to the tip of the source branch, else the new commits on the target branch would be lost.
Instead, Git records an explicit merge commit on the target branch. The merge commit will reference its two parent commits, and so create a non-linear history through two parallel branches of development. The merge commit will also record any changes needed to resolve conflicts arising from divergence between the merged branches.
The following animation demonstrates a no-fast-forward merge. As in the previous example, "A" and "B" are initial commits on the target branch, the source branch is created from commit "B", and commits "C", "D", and "E" are introduced to the source branch. But this time commits "F" and "G" are introduced to the target branch. These commits do not exist on the source branch. When the source branch is merged into the target branch, because the target branch has changes that do not exist in the source branch, the target branch cannot be simply fast-forwarded to the tip commit on the source branch. So Git handles the merge by recording an explicit merge commit, "H", on the target branch.

Even when the source branch is deleted, its unique commit history will be persisted via the merge commit, "H", which still exists in the target branch’s history.
Merges are fast-forwarded by default. If Git can resolve a merge without
requiring an explicit merge commit, it will do so. Git will create merge commits
only if the target branch contains divergent work that does not exist in the
source branch. You can override this default behavior, forcing an explicit merge
commit to be recorded every time, by using the --no-ff (no-fast-forward) flag.
git checkout <target-branch>
git merge --no-ff <source-branch>
This is demonstrated in the next animation. As before, "A" and "B" are initial
commits on the target branch, the source branch is created from commit "B", and
commits "C", "D", and "E" are introduced to the source branch. This time, no new
commits are added to the target branch. The source branch is merged into the
target branch using the --no-ff flag. Even though a merge commit is not
required to reconcile divergence between the two branches, an explicit merge
commit, "F", is nonetheless created on the target branch.

There are several advantages to explicitly recording merges in commit logs. Merge commits preserve the context in which changes were implemented and record how any divergence between parallel development branches was resolved. They also allow for easy reversal of integrations: you can revert a merge commit to remove all changes from a source branch in a single, clean operation—a powerful tool if an integration proves unstable.
The trade-off is that explicit merging produces non-linear commit histories on
the target branches. In busy projects with many integrations, merge commits
create considerable noise that makes the commit log difficult to reason with.
Merge commits tell us that two branches were integrated, but not what
changed. The git log output becomes less useful as a product-level changelog.
Squash-merging
Like fast-forward merging, squash-merging is an integration strategy capable of producing a clean, linear commit history.
It works like this. At the time of integration, Git collects all the changes introduced across every commit in the source branch, aggregates them all into a single changeset, and stages the diff. At this point, no commit is recorded. The user can then commit the changes, appending them to the target branch’s commit stack in a single commit. The user has the opportunity to review the changes, and make further modifications if necessary, before committing the changes to the target branch.
The end result is a single atomic commit, at the tip of the target branch, that captures all the changes introduced via the source branch. This is a new commit with no association to the original commits on the source branch. No merge commit is recorded, either.
The squash-merge strategy is demonstrated by the following animation. As before,
"A" and "B" are initial commits on the target branch, the source branch is
created from commit "B", and commits "C", "D", and "E" are introduced to the
source branch. Next, commit "F" is introduced to the target branch. Finally, the
source branch is squash-merged into the target branch using the --squash flag:
git checkout <target-branch>
git merge --squash <source-branch>
Git aggregates all the changes from commits "C", "D", and "E", and stages them. The user commits the staged changes, creating commit "G*" on the target branch. "G*" incorporates all the changes from commits "C", "D", and "E", but it is a new commit with no link to those source commits. When the source branch is subsequently deleted, no trace of it is preserved in the commit history.

It is worth noting that the behavior of git merge --squash varies depending on
the fast-forward configuration. You cannot use the --squash and --no-ff
options at the same time. The two flags are logically contradictory, because
--squash explicitly suppresses any merge commit, while --no-ff forces one.
But you can use --squash with --ff-only. With this config combination, Git
will check if the merge can be fast-forwarded and, if it can, it will proceed
with the squash operation. This can be a useful constraint if you want to
resolve conflicts in the source branch, but you also want to clean-up the source
branch’s messy history before merging it into the target branch.
Using the --squash flag is particularly well-suited to integrating source
branches that have noisy, work-in-progress histories. The intermediate commits
that accumulate during development – the fixes, the experiments, and the
incremental, unstable revisions – often tell a useful story within the context
of the source branch, but they contribute little to the product changelog.
Squashing strips away that granular history, replacing it with a single,
meaningful commit that represents the completion of a discrete, stable unit of
work.
The advantage of squash-merging is that trunk line history remains clean: every commit on the mainline represents a discrete, meaningful piece of work, not the messy intermediate steps. The trade-off is that useful context – decisions taken, alternative approaches tried, how conflicts were resolved – is irretrievably lost.
An important constraint: after a squash-merge, the source branch MUST be promptly deleted. Because the squashed commit on the target branch is not linked to the original commits on the source branch, Git cannot recognize that those changes have already been integrated. Any subsequent attempt to merge or rebase the same source branch will reintroduce the same changes and produce conflicts that Git cannot automatically resolve.
Rebasing
Rebasing is a more advanced integration strategy. The API is similar to
git merge, but the underlying operation is more complex. You checkout the
target branch and run git rebase. As with git merge, you pass the name of
the source branch as the first argument:
git checkout <target-branch>
git rebase <source-branch>
Rebase operations are more complex than git merge. Git walks back through the
history of the checked-out branch, undoing its unique commits one-by-one, until
it reaches the first commit that it shares with the source branch. At this
point, the checked-out branch is at the common ancestor of both branches. Git
then fast-forwards the checked-out branch to the tip of the source branch,
incorporating the source branch’s recent commits. Finally, the
previously-removed commits are reapplied. The original changes are reintroduced
as entirely new commits – new hashes are assigned to them.
In effect, the commits that are unique to the target branch are given a new base commit from which they inherit – literally, the commits are "rebased".
The following animation demonstrates a rebase operation. As in prior examples, commits "A" and "B" are added to the target branch, then the source branch is created from commit "B", and commits "C", "D", and "E" are subsequently introduced to the source branch. Next, commits "F" and "G" are introduced to the target branch. This time, the target branch is rebased on the source branch. Git undoes commits "F" and "G" on the target branch, so that the target branch now references commit "B", which is the nearest common ancestor it has with the source branch. Git then moves the tip of the target branch to the tip of the source branch, which is commit "E". Finally, Git replays the changes previously introduced in commits "F" and "G", now using commit "E" as their new base. The new commits added to the target branch will be given different hashes – in this animation the new commits are labelled "F*" and "G*".

If conflicts arise during the rebasing process, the commits being replayed onto the target branch will need to be updated to remain compatible with the changes introduced in the source branch. Thus commits "F*" and "G*" may not have exactly the same changes as the original "F" and "G" commits respectively.
Like squash-merging, rebasing gives users considerable flexibility. Rebasing
operations can be run in interactive mode (git rebase --interactive|-i), which
allows squashing multiple commits, dropping commits, reordering them, and
changing commit messages.
Conflict-resolution strategies
git merge, git rebase, and git cherry-pick all resolve conflicting hunks
through the same underlying three-way merge machinery, and all three accept a
-X (strategy option) flag that biases automatic conflict resolution towards
one side of the conflict, rather than stopping and requiring manual resolution:
git merge -X ours <branch>       # keep the current branch's version of any
                                  # conflicting hunk
git merge -X theirs <branch>     # keep the incoming branch's version instead

git rebase -X theirs <branch>
git cherry-pick -X ours <commit>
This only affects hunks that Git cannot merge cleanly on its own; hunks that
merge cleanly are merged normally regardless of the flag. It is not the same as
the whole-branch -s ours merge strategy, which discards the other side’s
changes entirely and unconditionally, even where no conflict exists.
-X ours/-X theirs MUST NOT be used as a default or blanket setting to
suppress conflicts in application code — doing so can silently discard changes
that a reviewer never sees, which undermines the provenance objective far
more than a manual conflict resolution would. It MAY be used narrowly, for a
specific, well-understood file that is expected to diverge predictably and
where one side is always correct by construction — for example, a
generated lock file, or a changelog header — most commonly when backporting a
fix across long-term support pipelines (see
TS-9: Version Control), where the same conflicting hunk (eg. a
version string) recurs on every backport.
Cherry-picking
Cherry-picking differs from the other integration strategies in a fundamental way. Rather than integrating all of the unique commits on a source branch into a target branch, cherry-picking selectively applies individual commits from anywhere in the repository’s history. It is a surgical tool for extracting specific changes from one branch and reintroducing them on another, without carrying across the surrounding history.
It works like this. You identify one or more specific commits and instruct Git
to apply their changes to the current branch using the git cherry-pick
command. Git replays each selected commit onto the target branch, recording the
same changes as a new commit. If there are conflicts with the target branch,
these will need to be resolved in the new commit – which would mean the diff is
different from the original commit.
Like rebasing, the new commit will have a different hash from its original. Cherry-picked commits are distinct objects in Git’s history – even if their diff is identical to the original commits.
The following animation demonstrates a cherry-pick operation. "A" and "B" are initial commits on the target branch. The source branch is created from commit "B". Commits "C", "D", and "E" are introduced to the source branch. Commits "F" and "G" are introduced to the target branch. A cherry-pick operation is then performed from the target branch, selecting commit "D" from the source branch. Git replays the changes introduced in commit "D" onto the target branch, recording a new commit, "D*", after "G". The source branch remains unchanged.

Cherry-picking is most useful when integrating an entire branch is not desirable or appropriate. A common scenario is backporting – applying a bug fix or security patch from a release branch to the current development trunk, so the fix is applied to the next release too. Cherry-picking is also useful when a single, well-scoped commit on a long-running feature branch needs to be promoted to a target branch ahead of the rest of the feature.
The trade-off is that cherry-picked commits are copies. They are not linked to their originating commits in the source branch. If the source branch is later merged or rebased onto the same target branch in full, Git will not recognize that some of those incoming changes have already been applied. The result can be conflicts that are difficult to resolve. For this reason, cherry-picking is best treated as a targeted, exceptional tool rather than a routine integration strategy.
Patching
Patching is the oldest of Git’s integration strategies, and the one from which Git itself grew. The Linux kernel project pioneered this workflow, where patches – self-contained, portable files describing a set of changes – were emailed between contributors and applied manually by maintainers. Git was designed by Linus Torvalds specifically to support this style of distributed, email-based collaboration.
It works like this. Changes are exported from a source branch as patch files
using the git format-patch command. Each file captures the diff of a single
commit, along with metadata such as the author, the commit message, and the
timestamp. These files can be shared by any means – emailed, archived, or
transferred directly – and applied to a target branch in any repository using
git am. The applied changes are recorded as new commits on the target branch,
with the original authorship preserved.
Patching is the only integration strategy that does not require the source and target branches to share a common remote repository. This makes it useful in contexts where direct repository access is not possible – air-gapped systems, or contributions to projects whose maintainers do not grant write access to external contributors. Outside of the Linux kernel ecosystem, however, it is rarely encountered in practice. Modern collaborative workflows, built around shared remote repositories and pull request systems, have made it largely redundant.
Recommendations
The choice of integration strategy depends on your goals for the commit history and your team’s workflow. This technical standard recommends different strategies for different contexts.
Integrating between trunk lines
To maintain a clean, linear history on a project’s trunk lines – so that
git log serves as a useful, high-level changelog – fast-forward-only merging
is the clear choice. This supports the objectives of provenance (clear change
history) and simplicity (straightforward integration without merge commits).
Use this for moving test to catch-up with dev, and ready to catch-up with
test:
git checkout test
git merge --ff-only dev

git checkout ready
git merge --ff-only test
This works well as long as no changes are ever committed directly to any trunks
except dev. The trunk lines are treated as a single branch in which all
commits originate on dev and incrementally flow via test to ready.
Integrating temporary branches into dev
For integrating temp branches into dev, this technical standard RECOMMENDS a
two-stage approach: rebase followed by fast-forward merge. This is the best
balance between clean history, safety, and practical workflow.
Stage 1: Rebase the temporary branch on dev
First, rebase the temp branch on the latest dev:
git checkout temp/*
git rebase dev
This ensures that the temp branch is compatible with the latest changes in
dev, and conflicts are resolved in the temp branch before integration into
the shared trunk. The rebase replay means that when the final integration
happens, it can simply fast-forward without additional conflict resolution.

Rebase your temporary branches on dev at least once per day. Do NOT merge
dev into temporary branches, as this can introduce regressions.
Stage 2: Fast-forward merge into dev
Once the rebase is complete, integrate using a clean fast-forward merge:
git checkout dev
git merge --ff-only temp/*
This ensures the integration is clean, fast, and reliable. The trunk line gains your commits as if they had always been there.

Why this strategy? Rebasing + fast-forward merging produces a clean linear history while resolving conflicts safely in source branches rather than the target branch. This avoids merge conflicts in the shared trunk. Even so, good test coverage is critical because two branches can integrate without line-level conflicts yet still produce regressions.
The main trade-off is that commit timestamps reflect the time of integration
rather than the time of authorship. If you need to preserve original author
dates, use git rebase --committer-date-is-author-date.
Alternative: Rebase + no-fast-forward merge
For larger integrations where the ability to undo the integration in a single
operation is valuable, use --no-ff instead of fast-forward:
git checkout dev
git merge --no-ff temp/*

This creates an explicit merge commit that records the integration point.
Because conflicts are already resolved in the rebased commits, the merge commit
records only the integration, not additional conflict resolution. The downside
is a less linear history, but you gain the ability to revert the entire
integration with a single git revert on the merge commit if it proves
unstable.
Integrating epic branches into dev
Epic branches are long-lived, accumulating commits from multiple contributors
over weeks or months. By the time they’re ready for integration, their commit
history is typically noisy with intermediate work-in-progress commits,
merge-down commits from dev, and incremental steps that are meaningful within
the context of the epic but add little to the trunk’s changelog.
For this reason, squash-merge is the RECOMMENDED integration strategy for
epic branches. Squash-merge consolidates the epic’s entire history into a
single, well-described commit on dev that represents the completion of the
epic’s work.
Epic integrations are typically performed via a pull request, which provides a structured forum for review and approval of the consolidated change. See PR config.
If integrating directly via the Git CLI:
git checkout dev
git merge --squash epic/*
git commit

After squash-merging, delete the source branch immediately. Because the squashed commit is not linked to the original commits, Git cannot recognize they’ve been integrated; a future merge would reintroduce them and cause conflicts.
The trade-off is reduced traceability on the trunk: how changes were implemented
within the epic, and how conflicts were resolved during merge-downs from dev,
is not preserved as individual commits. The epic’s full commit history can be
preserved through the PR’s audit log if needed.
Special case: Cherry-picking
Cherry-picking is useful for extracting specific commits rather than integrating an entire branch:
git checkout dev
git cherry-pick <commit>

Cherry-picking is best treated as a targeted, exceptional tool rather than a routine integration strategy. It’s valuable for backporting bug fixes or selectively promoting commits, but it creates copies that Git doesn’t recognize as already integrated, leading to potential conflicts if you later merge the full branch.
Summary
For most workflows, the recommendations are:
- Trunk-to-trunk integrations (
dev→test→ready): fast-forward-only merge. - Temporary branches into
dev: rebase followed by fast-forward merge, typically performed locally as part of continuous integration. - Epic branches into
dev: squash-merge, typically performed via a pull request.
Together, these strategies produce a clean, linear history on the trunk lines
while managing conflicts safely. The objective is for git log to serve as a
useful public changelog reflecting the high-level progress of the project,
supporting the objective of provenance.
For larger temporary-branch integrations where the ability to revert the entire integration in a single step is critical, the rebase + no-fast-forward merge alternative described above is also available.
Long-term support
So far we’ve assumed there is a single trunk line, in which changes in code and
configuration flow from dev via test to ready and, ultimately, to
release, where versions are tagged. This works fine for projects that only
support a single major version of the software at a time, and where the sequence
of releases is monotonic: 1.0.0 → 1.0.1 → 1.0.2 → 1.1.0 → 1.2.0 → 2.0.0 → 2.1.0
→ 2.2.0 → 3.0.0, etc. This will be true of most web applications and other
products where updates can be continuously deployed to well-controlled
production environments.
But this does not scale to projects that need to support multiple major versions of the software in parallel. This is necessary for long-term support (LTS), a product development strategy in which legacy releases are supported with bug fixes and security patches for a guaranteed time. In this case, the chronological sequence of releases may not be monotonic, eg. 1.0.0 → 1.1.0 → 1.2.0 → 1.3.0 → 1.2.1 → 1.1.1. This strategy is common for desktop and mobile software, and elsewhere where the software vendor does not control the host environments in which the software is installed.
To enable long-term support, we need to have multiple deployment pipelines, one for each supported version of the software. This extension supports the objective of scalability, allowing your team to maintain multiple versions in parallel. We can achieve this quite easily. All we need to do is extend our branch naming convention.
We start by prefixing all of our existing branches with the word "latest" followed by a forward-slash character:
dev→latest/devtest→latest/testready→latest/readyrelease(/)→latest/release(/)temp/→latest/temp/
The default branch is now latest/dev. All the trunks and branches prefixed
latest/ represent the main delivery pipeline for the project – the current
major version of the software.
Although the latest/ prefix is introduced here to support multiple parallel
pipelines, it is RECOMMENDED to adopt it from the outset even for projects that
expect to run only a single pipeline — including continuously-released software
like web apps. The cost is negligible, and it reserves the option to spin up a
second pipeline later without renaming the established trunks or reconfiguring
everything that references them. Parallel development of two versions of a
single application is occasionally desirable in every kind of software: a
big-bang rewrite, a disruptive framework migration, or a redesign that you want
to mature on its own pipeline before it supersedes the current one are all cases
where separating the next version from the current one is valuable, even when
only one version is ever released to production at a time. Starting with
latest/dev rather than dev means that, when such a moment arrives, the
current line is already correctly named and only the new line needs to be
created.
Let’s assume that the current major version of the software is v3. We can continue to support v2, too, via the following branches:
v2/devv2/testv2/readyv2/release(/**)v2/temp/**
And v1, too:
v1/devv1/testv1/readyv1/release(/**)v1/temp/**
We now have three delivery pipelines. Each pipeline has its own development,
testing, production-ready, and release trunks, as well as its own temporary
branches that are cut from the pipeline’s development trunk. Parallel
maintenance and development of multiple long-term support versions is now
possible. Feature development on the latest major version of the software flows
through the latest/ branches. Meanwhile patches for the legacy v2 and v1
releases can be managed using an identical workflow via a group of branches that
are prefixed v2/ and v1/** respectively.
It’s very flexible. Each LTS version can even have subtly different workflows.
Perhaps the latest/ pipeline has more quality gates than the legacy v1/
pipeline does. Each pipeline can deploy to different environments and have
different release strategies, as necessary.
Now imagine you want to start work on v4. All you do is create new branches from
each of the latest/** branches:
latest/dev→v3/devlatest/test→v3/testlatest/ready→v3/readylatest/release(/)→v3/release(/)latest/temp/→v3/temp/
Support for v3 now continues via the new v3/** branches, while v4 is promoted
to the latest LTS pipeline.
LTS branches MAY be deleted once a particular major version reaches its end-of-life. The release checkpoints in that major version will still exist in the repository’s history, marked by version tags.
Patching across multiple pipelines
When a bug is discovered in multiple maintained versions, it is RECOMMENDED to introduce the fix to the latest version first, then cherry-pick it backwards to older versions. This "upstream first" approach ensures the fix is merged first into the default main line of development, which helps to prevent the same bug from surfacing again in future releases. This practice supports the objective of provenance, ensuring that all bug fixes are traceable to their origin in the primary development line.
When backporting fixes to older LTS versions, if the versions have diverged significantly, additional commits may be needed to handle conflicts. In the worst case, you may need to patch each version separately.
Each additional maintained version multiplies the coordination overhead. A
single patch may need to be integrated into the latest/dev trunk and multiple
legacy development trunks, and the same patch will need to flow through multiple
delivery pipelines, repeating testing and release processes in each. For this
reason, it is RECOMMENDED to limit the total number of legacy versions you
maintain in parallel.
Release branches versus LTS pipelines
It is important not to confuse release branches with LTS pipelines. They serve
different purposes. Release branches (release(/**)) exist to support the
preparation of point releases, such as v1.2.3. LTS pipelines are groupings of
trunks and branches that exist to support the continuation of point releases
across multiple major versions, such as v1 and v2.
Naming convention variations
Instead of the latest/ prefix for the current major LTS release, you MAY
choose to be explicit about the version number. For example, latest/dev would
be v4/dev, and latest/test becomes v4/test. The main advantages are better
clarity and the immutability of branch names in LTS pipelines, which may reduce
the effort needed when bumping a major version number (eg. reconfiguring CI/CD
pipelines).
The main advantage of using the latest/ prefix is that you don’t need to
update the name of the default branch whenever you start work on a new major
version. The default branch is always latest/dev.
An alternative naming convention is to use the next/ prefix instead of
latest/, or even alongside it as another LTS pipeline. This might make sense
when the "latest release" (ie. what is currently in production) is distinct from
the "next release" (ie. the one you are currently working on but haven’t
released yet). "Next" clearly signals "this is the upcoming version", while
"latest" signals "this is the current version".
We’ve assumed that your LTS versions will correspond to a major version of the Semantic Versioning standard. If you follow a different versioning scheme, just go ahead and adjust the naming convention as appropriate.
v2.4/devv2.4-LTS/dev2026-spring/dev2026-fall/devalpine/devbirch/devcedar/dev
Whatever numbering scheme you use, it is RECOMMENDED to use the forward-slash
character (/) as the delimiter. Many Git GUIs will automatically collapse
branch lists into a tree-like structure based on the position of this delimiter
character, making it easy to navigate the list of branches within each LTS
pipeline.
Workflows
This section provides step-by-step instructions on introducing revisions to a Git repository and propagating those changes through the development, testing, and ready trunks.
Important
Rebasing MUST only be done locally on branches that have not been pushed to the
reference repository. Once you have pushed a branch to the reference repository,
its commit history must be treated as immutable. Rewriting history on shared
branches creates problems for other developers who may have based their work on
those commits. If you need to change commits that exist in a shared branch, use
git revert instead.
Introducing revisions to the development trunk
All revisions originate on the development trunk. The choice of workflow depends on your permissions, team size, and the nature of the work – supporting continuous integration, a core objective of this standard. There are five possible workflows:
- Trunk workflow: Atomic commits are added and pushed directly to the development trunk of the reference repository.
- Branch workflow: Atomic commits are added to short-lived temporary branches. When the changes are ready for integration, the development trunk is fast-forwarded to the HEAD of the temporary branch.
- Pull request workflow: Same as the branch workflow, except the integration of the temporary branch into the development trunk requires peer approval. A pull request system is used for this purpose, which is a separate system that’s integrated with the reference repository.
- Fork workflow: For external contributors (anyone who does not have write permissions on the reference repository), the workflow is the same as the branch workflow, except that temporary branches are pushed to a fork of the reference repository, and merge requests are made from the temporary branch in the fork repository (the source or head branch) to the development trunk in the reference repository (the target or base branch).
- Epic workflow: For long-lived, team-coordinated work that spans weeks or
months, epic branches provide a dedicated development line for complex,
big-bang integrations. Unlike temporary branches, epic branches use a
merge-down synchronization strategy to keep the epic branch synchronized with
dev, preserving the epic’s lineage as a distinct, long-lived development line.
Trunk workflow
This workflow is suitable for contributors who have write permissions on the reference repository, and who prefer to continuously integrate their changes to the development trunk, instead of using temporary branches.
- Clone the reference repository.
git clone git@<host>:/<team>/<repo>.git
- Checkout the development trunk.
git checkout dev
Tip
You might want to check that the development trunk is currently stable before building on it. Check the build and tests that are run against
devin the CI/CD system. Ifdevis unstable, you can instead checkout an earlier, stable commit hash. - Add small, atomic commits to the development trunk. Every commit MUST be a
stable, working increment of the software — meaning it does not break the
build and does not introduce known test failures.
Pre-commit hooks SHOULD run a fast subset of quality checks locally (linting, formatting, unit tests on changed files). Keep this fast — a few seconds at most. Checks slow enough to interrupt a developer’s flow create pressure to bypass them with
git commit --no-verify, which defeats their purpose. The full test suite runs in CI on every push todev, which provides the authoritative stability signal.git add . git commit [-m "<message>"]
- If you will make substantive changes over a long period, you should do regular commits, organizing your changes in small, logical increments, as explained in the section on atomic commits.
- Before pushing your changes upstream, synchronize your local development
trunk with the reference repository. You MUST use the rebase strategy when
pulling changes from the reference repository. This ensures that your local
changes, which you’ve not yet pushed, stay on top of recent changes that
other people have contributed to the upstream development trunk. (This is
explained in more detail in the section on integration strategies.)
git pull --rebase [origin dev]
If you encounter conflicts during the rebase, resolve them in your working files, then continue the rebase:
git add [file1] [file2] [...] git rebase --continue
Tip
When working directly on the development trunk, rebase your local branch on the upstream
devbranch regularly. You might use Git stashes or other techniques to keep your local working changes on top of new commits that are fetched from the upstream repository. - Push your changes to the development trunk in the reference repository. Do
this at regular intervals, ideally after every atomic commit. This means
other developers will always be working off the latest increment of the
continuously evolving software.
git push [origin dev]
If you receive an error that your push was rejected because the reference repository has changes you do not have locally, someone else has recently pushed new work. Return to step 5 to resync your local development branch with the upstream repository, then retry the push.
Branch workflow
This workflow is suitable for contributors who have write permissions on the reference repository, but who prefer to keep their work isolated from the development trunk until it’s ready for integration.
- Clone the reference repository.
git clone git@<host>:/<team>/<repo>.git
- Checkout the development trunk.
git checkout dev
- Create a temporary branch off the development trunk.
git branch temp/[<id>-]<description> git checkout temp/[<id>-]<description>
Or, more succinctly:
git checkout -b temp/[<id>-]<description>
Git ≥ v2.23 offers a slightly more intuitive syntax to switch between, and optionally create, branches:
git switch --create|-c temp/[<id>-]<description>
- Add small, atomic commits to the temporary branch. Aim for every commit to
be a stable, working increment. WIP commits are permitted on temporary
branches but MUST be cleaned up (rebased, squashed, or amended) before
integration into
dev.Pre-commit hooks SHOULD run a fast subset of quality checks locally (linting, formatting, unit tests on changed files). Keep this fast — a few seconds at most. Checks slow enough to interrupt a developer’s flow create pressure to bypass them with
git commit --no-verify, which defeats their purpose. The full test suite runs in CI when the branch is pushed and again before integration, providing the authoritative stability signal.git add . git commit [-m "<message>"]
- Keep your temporary branch synchronized with the development trunk in the
reference repository. You can either rebase the temporary branch directly on
the upstream development trunk:
git pull --rebase [origin dev]
Or you can first update your local development trunk and then rebase the temporary branch on your updated local development trunk:
git checkout dev git pull --rebase [origin dev] git checkout temp/[<id>-]<description> git rebase dev
Tip
You should synchronize temporary branches with the upstream development trunk at regular intervals. You may use Git stashes or other techniques to keep your working changes ahead of any new commits that are pulled downstream.
- OPTIONALLY, push your temporary branch to the reference repository. Use the
--set-upstreamoption, or its alias-u, to have your local temporary branch track a branch of the same name in the reference repository. The purpose of this step is to create a remote backup. Should your local repository be lost or corrupted, you can restore your work-in-progress from the reference repository.git push --set-upstream|-u origin temp/[<id>-]<description>
Tip
It is RECOMMENDED that branches in downstream repositories track branches in upstream repositories that have identical names. For example, your local
devbranch should track thedevbranch in the reference repository. This tracking is automatically established for permanent branches, likedev, when yougit clonerepositories. But you need to explicitly configure the same tracking for any temporary branches that you create.Because rebasing changes history, you might need to use
--force-with-leaseto force the new local history into the remote. This is safer than plain--forcebecause it will refuse to push if the remote branch has been updated by someone else, which helps prevent accidentally overwriting work by other developers. There is no harm in modifying the history of your temporary branches, as long as you are the solo committer to those branches.git push --force-with-lease [origin temp/[<id>-]<description>]
Only use
--force(without--lease) if you are absolutely certain that no other developers are working on the temporary branch. - When your work is ready for integration, fast-forward the development trunk
to the HEAD of your temporary branch. This will integrate your changes into
the development trunk, with all your new commits at the tip of the
development trunk.
git checkout dev git merge --ff-only temp/[<id>-]<description>
- After integration, delete the temporary branch to keep the repository tidy.
If you have pushed your temporary branch to the reference repository, you can
delete it there too.
git branch --delete temp/[<id>-]<description> git push origin --delete temp/[<id>-]<description>
Handling work-in-progress commits
When working on a temporary or epic branch, you will often create commits during
development that are incomplete or unstable (known as work-in-progress or WIP
commits). These commits MUST NOT be integrated into the dev trunk. Instead,
clean up your commit history before integrating.
WIP commits SHOULD only exist on temporary or epic branches. Before merging into
dev, ensure the tip of your branch is stable and passes all tests. You have
several options for cleaning up WIP commits:
- Soft reset — Use
git reset --soft <hash>to return to an earlier stable commit while keeping your working changes staged. Then commit those changes as a single clean commit. - Amend — Use
git commit --amendto modify and re-record the previous commit with your new staged changes. - Interactive rebase — Use
git rebase -i(interactive mode) to reorder, combine (squash), edit, or drop individual commits. This is powerful but requires care (see the section on interactive rebasing below). - Fixup commits — If you already know which earlier commit a WIP change
belongs to, use
git commit --fixup=<commit>instead of manually locating and reordering lines in an interactive rebase todo list. This records a commit prefixedfixup! <original subject>. Runninggit rebase -i --autosquash <base>then automatically moves each fixup commit into place immediately after the commit it targets and marks it to be squashed, without further editing of the rebase todo list. The relatedgit commit --squash=<commit>behaves the same way, except the fixup commit’s message is retained (concatenated onto the target’s) rather than discarded. - Squash-merge — When integrating the temporary branch into
dev, usegit merge --squashto combine all commits from the temporary branch into a single new commit ondev.
All history-rewriting techniques can only be used on temporary or epic branches
before they are pushed to the reference repository, or after they are pushed but
only if you force-push with git push --force-with-lease (which is safer than
--force). However, be cautious with epic branches: since they are long-lived
and shared, avoid rewriting history if possible and always coordinate with team
members. Once commits are merged into the dev trunk, they become immutable.
The EXPERIMENT flag MAY be used to mark experimental commits that are not
intended to be permanent. Experimental commits MUST be committed only to
temporary, epic, or spike branches and MUST NOT be integrated into dev, even
via squash-merge. (Spike branches are never integrated at all; see
TS-9: Version Control.)
Pull request workflow
Pull request (PR) systems are integrated features in most code repository hosting services (GitHub calls them pull requests; GitLab calls them merge requests). Rather than manually managing merges via the Git CLI, PR systems provide web-based interfaces and integrated tools to support code review and integration workflows.
This workflow is suitable for contributors who have write permissions on the reference repository, but who require their changes to be peer-reviewed before they are integrated into the development trunk. The PR system ensures that all changes are reviewed and approved before integration, supporting the objective of quality control and collaborative development.
- Clone the reference repository.
git clone git@<host>:/<team>/<repo>.git
- Checkout the development trunk.
git checkout dev
- Create a temporary branch off the development trunk.
git checkout -b temp/[<id>-]<description>
- Add small, atomic, passing commits to the temporary branch.
git add .
git commit [-m "<message>"]
- Keep your temporary branch synchronized with the development trunk.
git pull --rebase [origin dev]
If you get conflicts during the rebasing process, resolve them and then continue the rebase.
git add [file1] [file2] [...]
git rebase --continue
Do not revert changes made by other contributors if they conflict with yours. Rather, it is your work that will need to change for it to remain compatible with the latest iteration of the software.
- When you’re ready for your work to be reviewed and integrated into the
development trunk, push your temporary branch to the reference repository.
git push --set-upstream|-u origin temp/[<id>-]<description>
- Open a pull request from your temporary branch to the development trunk in the reference repository.
- Commit and push other changes to the temporary branch, as you get feedback
from your peers.
Tip
Most PR systems support marking a PR as "draft" or "work-in-progress" (WIP). Use this status when you are still actively developing and do not yet intend for the PR to be merged. Draft PRs signal to reviewers that feedback is welcome but final approval is not yet expected. This is useful for early feedback on in-progress work before it’s ready for final review.
- When the pull request is merged, you can delete the temporary branch from
your local repository.
git checkout dev git branch --delete temp/[<id>-]<description>
When deleting a local branch, you may receive a warning that commits exist in the deleting branch that do not exist in the current checked out branch (
dev). This is warning you about the possibility of losing commits:warning: deleting branch 'temp/...' that has been merged to 'refs/remotes/origin/temp/...', but not yet merged to HEAD.Your commits exist in the development trunk of the reference repository, but not yet the development trunk of your local repository. To fix that, synchronize your local development trunk with the reference repository.
git pull --rebase [origin dev]
It is RECOMMENDED that pull request systems be configured to automatically delete source branches from the reference repository after a successful merge operation.
Fork workflow
This workflow is suitable for contributors who do not have write permissions on the reference repository. The workflow is the same as the branch workflow, except that temporary branches are pushed to a fork of the reference repository, and merge requests are made from the temporary branch in the fork repository (the source or head branch) to the development trunk in the reference repository (the target or base branch). This workflow is commonly used for external contributions to open source software projects.
- Fork the reference repository, using the tools provided by the version control hosting service.
- Clone the fork.
git clone git@<host>:/<team>/<repo>.git
- The
git cloneoperation automatically configures a remote named "origin" that points to the fork repository. You will need to set up another remote to track the reference repository. We’ll call this "upstream":git remote add upstream git@<host>:<team>/<repo>.git
- Checkout the development trunk.
git checkout dev
- Create a temporary branch off the development trunk.
git checkout -b temp/[<id>-]<description>
- Add small, atomic, passing commits to the temporary branch.
git add .
git commit [-m "<message>"]
- Keep your temporary branch synchronized with the development trunk in the
reference repository:
git pull --rebase upstream dev
Alternatively, synchronize your local development trunk, then rebase your temporary branch on your updated local development trunk.
git checkout dev git pull --rebase upstream dev git checkout temp/[<id>-]<description> git rebase dev
+ This has the added benefit of keeping your local trunk synchronized with the reference development trunk, too.
- When you’re ready for your work to be reviewed and integrated into the
development trunk, push your temporary branch to your fork repository.
git push --set-upstream|-u origin temp/[<id>-]<description>
- In the pull request system attached to the reference repository, open a pull request from the temporary branch (the head branch) in your fork repository (the head repository) to the development trunk (the base branch) in the reference repository (the base repository). Commit and push other changes as required in response to feedback from the project’s maintainers.
- When the pull request is merged, you can delete the temporary branch from
your local repository.
git checkout dev git branch --delete temp/[<id>-]<description>
You can delete your fork and local repository, too, if you do not intend to make further contributions to the project.
Epic workflow
Epic workflows are suitable for long-lived, team-coordinated work that cannot be
broken down into small, independently-releasable changes. Unlike temporary
branches, which are short-lived and use a rebase-up synchronization strategy,
epic branches are long-lived and use a merge-down strategy to synchronize with
dev. The merge-down strategy creates explicit merge commits that preserve the
epic’s lineage as a distinct development line, avoiding the history-rewriting
complexity that rebasing would introduce for long-lived shared branches.
This workflow is suitable for large coordinated features, major refactoring initiatives, cross-cutting changes affecting multiple systems, or long-running architectural work requiring input from multiple team members.
- Clone the reference repository.
git clone git@<host>:/<team>/<repo>.git
- Checkout the development trunk.
git checkout dev
- Create an epic branch off the development trunk.
git checkout -b epic/[<id>-]<description>
- Add small, atomic commits to the epic branch. Tests MUST pass on every
commit. Multiple team members may contribute to the epic branch.
git add .
git commit [-m "<message>"]
- Push the epic branch to the reference repository to enable collaboration
among team members.
git push --set-upstream|-u origin epic/[<id>-]<description>
- Keep your epic branch synchronized with the development trunk by merging
devinto the epic branch. This differs from temporary branches, which are synchronized by rebasing the temporary branch ondev. The merge-down strategy preserves the epic’s history as a distinct, long-lived development line.git fetch origin git merge origin/dev
If you encounter conflicts during the merge, resolve them in your working files, then complete the merge:
git add [conflicted files]
git commit
Perform this synchronization at regular intervals, ideally when significant changes land on
devor before integrating work from other team members.Tip
Because the epic branch is long-lived and shared, always communicate with your team before force-pushing. If you need to rewrite history on an epic branch (which should be rare), use
git push --force-with-leaseand coordinate with all contributors to that epic. - When the epic is complete and ready for integration into the development
trunk, integrate using squash-merge. Epic branches accumulate long,
often noisy histories over weeks or months; squash-merge consolidates them
into a single meaningful commit on the trunk.
The RECOMMENDED approach is to open a pull request from the epic branch to
devand use the PR system’s squash-merge option. See TS-9: Version Control and TS-9: Version Control for details.Alternatively, you can squash-merge directly via the Git CLI:
git checkout dev
git pull --rebase origin dev
git merge --squash epic/[<id>-]<description>
git commit
- After integration, delete the epic branch to keep the repository tidy. If
you have pushed your epic branch to the reference repository, delete it
there too.
git checkout dev
git branch --delete epic/[<id>-]<description>
git push origin --delete epic/[<id>-]<description>
Advanced techniques: Interactive rebasing
Power users may find interactive rebasing useful for cleaning up commit history
before merging. Use the -i or --interactive flag with git rebase:
git rebase -i <base-commit>
This opens an editor showing all commits since the base commit. For each commit, you can choose an action:
- pick (default) — Keep the commit as-is
- squash — Combine this commit’s changes into the previous commit
- edit — Stop during rebase so you can modify the commit (change content, message, split it, etc.)
- drop — Remove the commit entirely
- reorder — Reorder commits by changing their position in the list
Interactive rebasing is powerful but should be used carefully:
- ONLY use interactive rebase on branches that have not been pushed to the reference repository, or on branches you own where you are the only committer
- NEVER use interactive rebase on commits that have been merged into the
dev,test, orreadytrunk lines, as this violates the immutability constraint - If other developers have based work on commits you want to rebase, they will experience conflicts and problems
- Document your rebase intentions clearly so reviewers understand what was changed and why
The safer approach for most situations is to use squash-merge when integrating
into dev, rather than attempting to clean up history with interactive rebase
beforehand.
Reordering, splitting, or dropping commits during an interactive rebase can
silently break the "don’t break the build" constraint on atomic commits (see
TS-9: Version Control) — a commit that passed its tests in its original
position may not still pass once its context has changed. The --exec option
re-runs a given command after every commit as the rebase replays them, so a
broken intermediate commit is caught immediately rather than discovered later
by git bisect:
git rebase -i --exec "<test-command>" <base-commit>
If the command fails after any commit, the rebase pauses at that point for you to fix the commit before continuing, the same as if a conflict had occurred.
Tip
--exec can be combined with -i to review and rework commits interactively as
well as retest each one, or used without -i to non-interactively retest an
existing series of commits after a rebase onto a new base.
Integrations to the testing and ready trunks
Once revisions are committed to the development trunk, those revisions now flow through the testing trunk to the ready trunk.
We describe these as manual steps using the Git CLI. However, the goal of course is to automate as much of this workflow as possible, using continuous integration and deployment pipelines integrated with the reference repository. The manual steps are described to give a clear picture of the underlying branching and merging strategy, which can then be implemented in an automated fashion. The objective is for changes to flow as quickly as possible from development via testing to stable, so there is as little divergence as people between stable (what new work is being built on) and development (which that new work will be integrated with).
The sequence of steps is as follows:
- In the reference repository, run tests on every change to the HEAD commit of the development trunk.
- If the tests pass, fast-forward the testing trunk to the passing commit on
the development trunk.
git checkout test
git merge --ff-only <hash>
- Run extended tests on every change to the HEAD commit of the testing trunk.
- If the extended tests pass, fast-forward the ready trunk to the passing
commit on the testing trunk.
git checkout ready
git merge --ff-only <hash>
- OPTIONALLY, final checks can be run on the ready trunk. The aim here would be to do any additional steps required before releases are cut. These steps may include manual work, such as the review of release notes.
The tip of the ready trunk represents the latest stable increment of the software. It is immediately shippable to production environments. From here, the release process will vary, depending on the release cadence and distribution channels of the product. This is covered in more detail in the section on release strategies.
Worktrees
It is RECOMMENDED to checkout Git repositories as worktrees. This adds some complexity but gives greater flexibility. For example, you can seamlessly switch to another branch while leaving a dirty working directory in the current branch – handy if you need to quickly fix a production bug. Worktrees are also necessary to support parallelism in agentic workflows.
To use worktrees, you clone the repository as a "bare" repository – nothing’s
checked out by default: git clone --bare <repository>. Then, from the context
of the bare repository, you add worktrees using git worktree add …. Each
worktree is a directory that behaves just like a regular Git repository, with a
single branch checked out.
You can add multiple worktrees to a single repository, each having a different branch checked out. The only constraint is that you can’t have the same branch checked out in more than one worktree at a time. The purpose of this constraint is to stop you from clobbering working changes in another worktree that are not yet committed.
Best practice is to keep your worktrees adjacent to each other, as siblings. The
clean, widely-used pattern is to put the bare repo in a hidden .bare directory
and place a .git file at the project root that points to it:
mkdir myproject && cd myproject

# Clone bare into a hidden directory.
git clone --bare git@github.com:user/repo.git .bare

# Point the project root at the bare repo, so git commands
# work from here.
echo "gitdir: ./.bare" > .git

# Fix the fetch refspec (bare clones don't set this up correctly).
git config remote.origin.fetch '+refs/heads/*:refs/remotes/origin/*'
git fetch origin

# Add worktrees as siblings.
git worktree add main                    # Existing branch.
git worktree add -b feature-x feature-x  # New branch.
This produces:
myproject/
├── .bare/         # Bare repository root.
├── .git           # File containing "gitdir: ./.bare".
├── main/          # Working tree for `main` branch.
└── feature-x/     # Working tree for "feature x".
The .bare directory, which sits adjacent to the project directories main and
feature-x, has all of the internal Git repository data.
The alternative pattern is to nest the worktrees under the bare repository:
mkdir myproject && cd myproject

# Clone bare into a hidden directory.
git clone --bare git@github.com:user/repo.git .bare

# Add worktrees as siblings.
git worktree add main                    # Existing branch.
git worktree add -b feature-x feature-x  # New branch.
This produces:
myproject/         # Bare repository root.
├── HEAD
├── branches/
├── ...            # Other Git internals.
├── main/          # Working tree for `main` branch.
└── feature-x/     # Working tree for "feature x".
Notice that your working directories are mixed in the same area of the filesystem as Git’s internal files.
The adjacent pattern has a number of advantages:
- It keeps your working files cleanly separated from Git’s internal plumbing (objects, refs, packed data). Mixing them is confusing and invites accidents.
- Editors, search tools, and file watchers won’t descend into the
.baredirectory and choke on Git internals. - The mental model is clear:
.bareis Git’s data, while the sibling directories each represent "an active branch I’m working on".
Adding the .git pointer file as another sibling is a little trick that
provides a bit of convenience. Without this, to run any git worktree commands
(eg. to remove a worktree you no longer need), you’d have to change into the
.bare directory and run the command from there. Now all git worktree
commands, as well as commands like git fetch, all work from the project root.
echo "gitdir: ./.bare" > .git
The second little hack fixes the refspec for the git fetch command. Without
setting this manually (git clone --bare doesn’t do it), your remote-tracking
branches won’t update on git fetch, and in turn
git worktree add <remote-branch> won’t behave as expected.
git config remote.origin.fetch '+refs/heads/*:refs/remotes/origin/*'
See also gitworktree.org, a community-maintained
reference covering git worktree commands, workflows, and IDE integrations in
more depth than is in scope for this technical standard.
Git configuration
To support the workflow described in this technical standard, you SHOULD
configure Git for the following settings. You can do this by editing your
~/.gitconfig file, else using Git’s git config command.
init.defaultBranch
The branching and merging workflow described in this technical standard
recommends the use of a default branch named dev, or latest/dev where
multiple long-term support (LTS) versions are maintained in parallel. This
naming supports the objective of simplicity by using semantically clear branch
names.
The following setting will tell Git to use this name for the initial branch of a
new repository, replacing main or master whenever you initialize
(git init) a new repository.
[init]
  defaultBranch = dev
merge.ff
This technical standard RECOMMENDS that nearly all merges be done with the fast-forward-only constraint:
git merge --ff-only
You can make this the default merge option, so you won’t need to supply the
--ff-only flag every time:
[merge]
  ff = only
An objective of the version control workflow described in this technical standard is to maintain clean, linear commit histories, supporting simplicity and provenance. Fast-forward merges achieve this. In fast-forward-only mode, merge commits (which produce non-linear commit histories) are never applied.
When there is divergent work in the target branch that blocks a fast-forward, a
git merge operation in fast-forward-only mode will fail. In this scenario, you
must rebase the source branch on the target branch before retrying the merge:
git rebase <branch>
git merge --ff-only
Note
Epic branches use a merge-down synchronization strategy that intentionally
creates merge commits (see TS-9: Version Control and
TS-9: Version Control). The merge.ff = only setting will prevent these
merges. When working with epic branches, override the default per-merge by
passing --no-ff (or simply omitting --ff-only). For the epic merge-down
sync, the explicit form is:
git merge --no-ff origin/dev
Tip
Since Git 2.36, you can avoid having to remember the per-merge override by
configuring a conditional include scoped to epic branches. Add the following to
your ~/.gitconfig:
[includeIf "onbranch:epic/"]
  path = ~/.gitconfig-epic
Then create ~/.gitconfig-epic with:
[merge]
  ff = true
This automatically restores Git’s default merge behavior (fast-forward when
possible, merge commit when not) whenever the checked-out branch starts with
epic/.
pull.rebase
git fetch and git pull are frequently confused. git fetch downloads new
commits, branches, and tags from a remote into your local object database and
updates your remote-tracking refs (eg. origin/dev) — it never touches your
working tree or any local branch. git pull is shorthand for git fetch
followed immediately by an integration step (a merge or a rebase) that brings
those fetched changes into your current local branch. This technical standard
sometimes recommends git fetch on its own — for example, when synchronizing
epic branches with dev — specifically to keep the download step separate
from the integration step, so the merge can be inspected and conflicts resolved
deliberately rather than as a side effect of a single combined command.
For git pull operations, you have two options:
- Fast-forward-only
- Rebase
Both are good options and both support the version control workflow described in this technical standard.
The advantage of the fast-forward-only strategy on git pull operations is
consistency with the configuration for git merge operations. Since this is not
Git’s default behavior, you must opt-in to it:
git pull --ff-only [<branch>]
You can make this the default pull strategy by setting the following in your
~/.gitconfig:
[pull]
  ff = only
Now you won’t need to use the --ff-only flag on every git pull operation.
You can still override the default using other flags such as --no-ff.
The fast-forward-only strategy ensures that the local branch is always
fast-forwarded to the upstream branch, and explicit merge commits are never
recorded on the local branch. If there is divergent work in the upstream branch,
the pull operation fails, requiring you to first perform a git rebase on the
upstream branch.
git rebase <branch>
git pull --ff-only
Using the pull-rebase strategy automates the initial rebasing step. On
git pull, Git attempts a fast-forward. If that’s not possible, it rebases your
local commits onto the upstream branch before retrying the pull operation. In
effect, the following command does git rebase <branch> && git pull --ff-only:
git pull --rebase [<branch>]
You can make the --rebase flag the default behavior by adding the following
setting to your ~/.gitconfig. This setting will take precedence over any
pull.ff settings.
[pull]
  rebase = true
The end result is the same linear history, but the workflow differs:
pull.rebase = true automates the rebase step, whereas pull.ff = only
requires you to perform the rebase manually. The choice is between automation
and explicit control.
Tip
Even with these options set in your ~/.gitconfig, this may not change the
default behavior of Git GUIs, such as those built into code editors like
IntelliJ or VS Code. You may need to adjust equivalent settings in the Git GUIs
you use.
Other recommended configurations
The following configurations are RECOMMENDED, though they are not necessary to implement the version control workflow described in this technical standard.
push.autoSetupRemote
When you create a new local branch and run git push for the first time, Git by
default refuses the operation and asks you to specify the upstream tracking
branch. Alternatively, you can set up branch tracking, which creates
associations between local and remote branches, using
git push --set-upstream origin <branch> (or the shorter -u flag). Thereafter
you can git push without further arguments.
Since Git 2.37, this manual step can be eliminated by enabling the following setting:
[push]
  autoSetupRemote = true
With this enabled, git push on a new branch automatically creates a branch of
the same name on the remote, and sets it as the upstream tracking branch.
Subsequent pushes and pulls on that branch then work without further
configuration.
An advantage of this setting is that it forces local and remote branches that track one another to have identical names. With the manual setup, upstream tracking branches can be named differently — which can happen accidentally — and this can be confusing or break automated processes that depend on consistent branch naming.
commit.gpgSign
By default, Git does not verify the identity of commit authors. The user.name
and user.email values recorded against each commit are taken directly from the
local git config, and anyone can set these to any value. This means it is
trivial to forge authorship. A malicious actor can author commits that appear to
have been made by someone else.
Signing commits mitigates this by attaching a cryptographic signature that verifies the author’s identity. Signing allows genuine commits to be distinguished from forged ones. Many hosting providers (GitHub, GitLab, etc.) will display a "Verified" badge on signed commits, and some organizations require signed commits on protected branches.
Commit signing is most valuable for open source projects, where maintainers routinely accept contributions from untrusted third parties and have no other means of verifying that a commit genuinely originated from its claimed author. For closed source projects, the risk is lower, because push access is already gated by authentication (SSH keys, personal access tokens, etc.), so the set of possible commit authors is already constrained to known, trusted individuals. However, signing is still useful in closed source contexts for audit trails, regulatory compliance, and defense-in-depth against insider threats or compromised developer accounts.
Git supports three signing formats: GPG (the original, via gpg), SSH (since
Git 2.34, reusing your existing SSH key), and X.509 (via gpgsm). SSH signing
is the simplest to set up if you already use an SSH key for Git authentication.
To enable SSH-based commit signing:
[commit]
  gpgSign = true
[tag]
  gpgSign = true
[gpg]
  format = ssh
[user]
  signingKey = ~/.ssh/id_ed25519.pub
Replace the signingKey path with the public key you want to sign with. You
will also need to register the same public key as a signing key with your Git
hosting provider (this is a separate step from registering it as an
authentication key).
For GPG-based signing, omit the gpg.format line (GPG is the default) and set
user.signingKey to your GPG key ID.
core.autocrlf
[core]
  autocrlf = false
This setting tells Git not to transform line endings to CRLF (Windows' native line ending format) when files are checked out from a remote repository to a local repository on a Windows system. Doing such a transformation is unnecessary since all modern code editors can be configured to support Unix line endings (LF), and this can be enforced at the repository level using tools like EditorConfig.
core.eol
[core]
  eol = lf
This setting tells Git to normalize line endings to the Unix standard (LF) on
all files that Git auto-detects as being text-based. This is equivalent to
adding the following rule to .gitattributes.
* text=auto eol=lf
rerere.enabled
This workflow rebases branches onto dev frequently — the RECOMMENDED cadence
is at least once per day for temporary branches (see
TS-9: Version Control), and epic branches merge dev into themselves at
regular intervals. Both patterns can require resolving the same conflict
repeatedly: a rebase replays every commit on the branch against the new base, so
a conflict in an early commit may need to be resolved again for each subsequent
rebase, and a long-lived epic branch can hit the same conflicting hunk on every
merge-down until the underlying divergence is finally reconciled.
Git’s reuse recorded resolution feature eliminates this repeated effort. Once enabled, Git records how you resolved a conflict and automatically reapplies the same resolution if an identical conflict recurs.
[rerere]
  enabled = true
This is a purely local setting with no effect on the recorded history or on other contributors — it only changes how conflicts are resolved on the machine where it’s enabled. There is no reason not to enable it globally.
Git aliases
Git aliases can streamline your workflow by creating shortcuts for frequently-used commands. The following aliases support the version control workflow described in this technical standard:
Preserve committer dates during rebase:
When you run git rebase, the commit objects have their committer dates reset
to the current date. To preserve the original author date as the committer date:
[alias]
  rb = rebase --committer-date-is-author-date
Then use git rb instead of git rebase.
Safe force push:
The --force-with-lease flag is safer than --force when rewriting history on
pushed branches. Create an alias to make it easier to use:
[alias]
  puff = push --force-with-lease
Then use git puff instead of git push --force-with-lease.
Fast-forward merge:
To make fast-forward-only merges more convenient:
[alias]
  ff = merge --ff-only
Then use git ff <branch> instead of git merge --ff-only <branch>.
Synchronize with upstream:
Create an alias that synchronizes your local branch with the upstream, using your preferred strategy (rebase or ff-only):
[alias]
  sync = pull --rebase
Or:
[alias]
  sync = pull --ff-only
Then use git sync instead of git pull --rebase or git pull --ff-only.
PR config
Pull request (PR) and code review systems are essential infrastructure in collaborative development. These systems are typically deeply integrated into upstream reference repositories, where they serve as gatekeepers for code quality and provide a mechanism for enforcing workflow constraints. One of the key controls is the set of merge types permitted on the target branch.
When to use pull requests
Pull requests are a useful tool, but they are not a universal default. This standard prioritizes continuous integration over PR-gated review, because PR-gated workflows introduce significant costs:
- Blocked progress — A change cannot be merged until reviewers sign off. Authors wait for reviewers; reviewers wait on context.
- Context switching — Reviewers are pulled from their own work to read and understand somebody else’s; authors are pulled back to address feedback after they have moved on. Both forms of switching reduce productive output.
- Slow integration — Every minute a change spends in a PR is a minute it isn’t integrated. Long PR queues encourage long-lived branches, which encourages bigger PRs, which take longer to review. The cycle reinforces itself.
The trunk and branch workflows described in TS-9: Version Control allow continuous integration without PR gates. Quality is maintained by:
- Pair (or mob) programming — code review happens in parallel to
implementation, in real time. By the time the change reaches
dev, it has already been reviewed. - Strong automated checks in the delivery pipeline — linting, formatting, type-checking, unit tests, integration tests, secret scanning, security scanning. These provide consistent, fast feedback without human latency.
PRs SHOULD be reserved for cases where the workflow specifically requires them: external contributions via the fork workflow, and the integration of epic branches, where a long-lived branch’s accumulated history must be reviewed and squash-merged as a coherent unit. Minimising the number of epic branches in favour of small, continuously-integrated changes is itself a goal.
For internal contributors with write access, the trunk or branch workflow is RECOMMENDED. Where a PR is opened, the guidance in the rest of this document applies.
Target branch
All pull requests MUST target the development trunk (dev, or <version>/dev
in projects with parallel LTS pipelines — see
TS-9: Version Control). New work does not enter the pipeline at any
other point. The test, ready, and release branches are downstream of dev
and are populated only via the automated promotion described in
TS-9: Version Control. PRs to those downstream branches MUST be rejected by
repository configuration.
Merge types
Different merge strategies produce different commit histories, each with different tradeoffs.
- Basic merge (non-fast-forward) — Preserves non-linear history exactly as it happened during development. Simple to understand, but results in a very noisy history that is not particularly useful for auditing or understanding why changes were made.
- Rebase and fast-forward — Creates a linear history by replaying the source branch commits onto the target branch without a merge commit. Effective and produces a clean history, but is an advanced workflow that can be dangerous (because it rewrites history) and difficult for less experienced developers to understand.
- Rebase with merge commit — Creates a semi-linear history by replaying the source branch commits onto the target branch and then creating a merge commit. Offers a middle ground between rebase-only and basic merge, but combines some of the complexity of rebasing with some of the verbosity of merge commits.
- Squash-merge — Creates a linear history by condensing all commits from the source branch into a single new commit on the target branch. Strips intermediate development history but produces a clean, atomic commit on the trunk. Requires that the source branch be deleted after the merge, since the squashed commit is not linked to the original commits.
Recommended configuration
This technical standard RECOMMENDS the following PR merge configuration on the development trunk:
- Rebase and fast-forward — RECOMMENDED for integrating temporary branches
(
temp/) intodev. This is consistent with the local Git CLI workflow described in *TS-9: Version Control. Temporary branches are short-lived and have clean, linear histories that are worth preserving as discrete commits on the trunk. - Squash-merge — RECOMMENDED for integrating epic branches (
epic/*) intodev. Epic branches accumulate weeks or months of intermediate commits, including merge-down commits fromdevand incremental work-in-progress. Squash-merge consolidates this history into a single meaningful commit on the trunk. - Basic merge and rebase with merge commit — NOT RECOMMENDED, since they produce non-linear or otherwise noisy histories that undermine the provenance objective.
No merge configuration applies to spike branches (spike/), since they are
exploratory and never integrated into any trunk (see
*TS-9: Version Control). A spike MAY still have a draft PR opened against it as a forum for discussing the approach (see Draft
/ work-in-progress PRs below), but that PR is closed rather than merged.
The choice of strategy is driven by the type of source branch, not by the workflow used to integrate it. Whether the integration happens locally via the Git CLI or via a pull request, the same merge type applies for a given source branch type.
Where the hosting provider supports it, this configuration SHOULD be enforced at the repository level — restricting which merge types are selectable on the target branch — rather than left to convention. A recommendation that is only ever written down is one an author can override with a single misclick; an enforced setting removes the possibility of an accidental basic merge introducing a stray merge commit into what is meant to be a linear trunk history.
Code owners
Repositories SHOULD include a code owners file (typically CODEOWNERS at the
repository root or under .github/, .gitlab/, etc., depending on the hosting
provider’s convention) that maps paths in the repository to the teams or
individuals responsible for reviewing changes to those paths.
When a pull request is opened, the PR system uses the code owners file to automatically request reviews from the relevant owners. Owners MAY also be configured as required approvers, gating merge until at least one owner has signed off.
Code owners files serve several purposes:
- Reviewer routing — contributors don’t need to know who to ask; the right people are notified automatically.
- Knowledge sharing — new contributors can read the file to understand who maintains what.
- Security and quality gates — sensitive paths (eg. authentication, payment processing, infrastructure-as-code) can require approval from designated owners.
Code owners SHOULD be teams rather than individuals where possible, so review coverage is preserved when an individual is unavailable. Individuals MAY be combined with team listings for redundancy.
Two reviewers is RECOMMENDED as the target for non-trivial changes — research on software peer review has found this to be roughly the point of diminishing returns, beyond which additional reviewers add review latency without a proportionate improvement in defect detection. Where a code owners file routes reviews automatically, avoid repeatedly assigning the same one or two individuals regardless of team size; rotating review responsibility across the owning team distributes workload and spreads knowledge of the codebase more evenly, which is a further reason to prefer team-based code ownership over individual ownership.
Task lists in PR descriptions
Pull request descriptions SHOULD use task lists (Markdown checkboxes) for any non-trivial change. They give the author a self-checklist (tests added, docs updated, migration steps documented), give reviewers a quick view of what’s done and what’s outstanding, and — for work spanning multiple PRs — make dependencies explicit. Most PR systems aggregate nested task lists across linked issues and PRs.
A PR description SHOULD also state how the change can be manually verified, where automated tests alone don’t give a reviewer confidence — for example, the steps or commands needed to reproduce a fixed bug, or the state to check for in a running environment. For changes with a visible UI effect, the description SHOULD include before/after screenshots or a short recording. Automated checks confirm that a change behaves as coded; this additional context lets a reviewer confirm that a change behaves as intended, without re-deriving it from the diff alone.
PR titles
A PR title becomes the commit message on the trunk when the PR is squash-merged.
PR titles SHOULD therefore follow the same revision header conventions as commit
subject lines (see TS-9: Version Control): a lowercase type prefix, an
optional scope, the BREAKING/INCOMPAT flag where applicable, and a concise
imperative subject. For example: behavior(auth): add OAuth device flow or
fix: handle empty cart on checkout.
For temp-branch PRs that are rebased and fast-forwarded, the PR title is informational only — the original commit subjects land on the trunk verbatim — but using the same convention keeps PR lists consistent with trunk history.
Draft / work-in-progress PRs
Most PR systems support marking a PR as a draft or work-in-progress (WIP). This signals that the PR is open for review and discussion but not yet ready for merge.
PRs are dual-purpose: they request a merge, but they are also a forum for code review. Opening a draft PR on an actively-developed branch creates an asynchronous review channel — the team can comment on the work in progress, suggest improvements, or commit fixes directly to the branch — without committing to merge yet. When the work is ready, the draft status is cleared and the PR is reviewed for final approval.
This pattern is particularly useful for:
- Long-running features where regular pair or mob programming is not viable.
- Spike work where the team wants to discuss the approach before the implementation is finalised.
- Cross-team coordination where stakeholders outside the immediate development team need visibility into work-in-progress.
Draft PRs do not change the prioritisation of continuous integration. The work
itself MUST still land on dev as soon as it is complete and stable — a draft
PR is not a license to keep work isolated indefinitely.
Continuous integration and delivery
Implementing continuous integration (CI) and continuous delivery (CD) requires significant cultural and organizational changes. CI/CD is fundamentally about processes and practices, not just tools. Success depends on alignment across your team and infrastructure on how work is organized, integrated, and validated.
Breaking down work
The first requirement for frequent integration is to break down features into
work that can be completed and integrated within one to two days. This enables
developers to integrate their work to dev frequently without maintaining
long-lived branches that diverge significantly from the mainline.
Features that cannot be completed within this timeframe should still be
integrated into dev in a disabled or inactive state, so the in-progress work
continues to be exercised against the latest mainline without exposing it to
users or breaking releases. The two main techniques are:
- Feature flags (also called feature toggles or feature switches) — conditional statements in the code that determine whether a particular feature path is active. The flag state is typically controlled at runtime via a configuration service, so features can be enabled or disabled without redeploying. New code paths sit behind a flag in the off state until the work is complete and the flag is flipped on. See TS-10: Releasing for more on the lifecycle of feature flags.
- Branch by abstraction — refactoring under an abstraction layer rather than in a long-lived branch. The pattern: introduce an abstraction (interface, adapter, or facade) over the existing implementation, migrate callers to use the abstraction, then build the new implementation behind the same abstraction. Both implementations can coexist in the codebase; switching between them is a small, controllable change (typically via a feature flag). Once the new implementation is complete and validated, the old implementation and the abstraction (if no longer needed) are removed. Typical uses include swapping a database, a payment provider, or a library dependency without interrupting other developers' work. The abstraction MAY be retained after the migration rather than removed, if it provides a useful seam for mocking in unit tests.
Both techniques achieve the same goal: incomplete or in-progress work lives on
dev from the start, integrating continuously with everything else, without
exposing the unfinished feature to users or destabilising releases.
For rare cases where features are genuinely too complex to decompose into small
increments—such as large coordinated refactoring initiatives, cross-cutting
architectural changes, or research explorations—epic branches provide a
dedicated development line that can be synchronized with dev over weeks or
months using a merge-down strategy. Epic branches should be the exception rather
than the norm; the default should always be to break work down into smaller,
independently-releasable pieces.
For issues that span days or weeks but do not warrant an epic branch, the work
SHOULD land as a series of progressive commits or PRs over the issue’s lifetime,
each integrating to dev as soon as it is complete and stable. An issue is not
always a one-to-one mapping with a PR — a long-running issue should produce a
steady stream of incremental, integrable changes, not a single big-bang merge at
the end.
Prioritizing code review
Code reviews must be prioritized and expedited within your team. Integration velocity is directly limited by code review latency. When reviews are delayed, developers stall waiting for approval, and the natural incentive to break work into smaller, reviewable chunks diminishes.
The discipline of small, frequent commits naturally results in smaller, more focused pull requests. These are faster to review, easier to understand, and lead to more collaborative and productive review discussions.
As a concrete guideline, keep each reviewable unit — a single commit, a PR, or a squash-merged slice of an epic — under approximately 2,000 lines of new or changed code. This is not a hard technical limit, but beyond this size reviewers tend to skim rather than read closely, and defects hide in the parts that received the least attention. A genuinely new, self-contained feature does not need every sub-feature split into its own commit or PR merely to satisfy this guideline. But if a reviewable unit is approaching or exceeding this size, that is a signal to split it — for example, by landing supporting refactors or scaffolding as separate, smaller changes ahead of the feature itself.
Where a PR-gated workflow is unavoidable, review latency is only a problem if it blocks progress. When planning a larger piece of work broken into several reviewable units, identify up front which units are genuinely independent of one another — as opposed to units where the next step’s design cannot be finalized until the prior step’s review lands. For the independent units, start the next one as soon as the current one is submitted for review, rather than waiting idle for approval. This is not possible for units that are truly sequential (each depending on the reviewed shape of the last), so the split itself should be planned with this in mind, not decided arbitrarily as work proceeds.
Automation is essential
Automating quality checks—linting, testing, builds, deployments—is critical to success. Too many manual or slow processes create bottlenecks that prevent frequent integration and lengthen the feedback cycle between development and quality assurance.
Automated checks should run on every commit to dev and on every promotion
through the trunk lines (test, ready). This provides rapid feedback and
enables developers to catch and fix issues quickly.
Reverse-merge strategy
A counterintuitive but essential practice is the reverse-merge strategy: instead of trying to keep your side branch isolated from the mainline, continuously pull changes from the mainline back into your work-in-progress branch.
This practice addresses a fundamental tension in CI/CD: you need to integrate frequently to catch integration issues early, but you cannot afford to merge incomplete or broken work to the mainline. The solution is to never integrate work-in-progress to the mainline. Instead, keep pulling the latest stable changes from the mainline into your branch. This allows you to:
- Test your changes against the full current codebase, including concurrent work from other team members
- Detect integration issues early, before your code reaches the mainline
- Keep your work in sync with the mainline, reducing merge complexity when you do integrate
This approach prevents your local branch from drifting too far from the mainline, while ensuring that only completed, releasable work is merged to the trunk lines.
Semantic conflicts
Even with a frequent and linear commit history, integrations can fail due to semantic conflicts — changes in two or more branches that do not conflict at the line level but together break the build or violate a contract. A common example: one PR renames a function; another, developed in parallel, adds new code that calls the function by its old name. Each PR builds and passes tests against the current trunk; neither produces a merge conflict; but the moment both are integrated, the build is broken on the trunk.
git merge cannot detect semantic conflicts — they are by definition outside
the scope of textual diffs. Mitigations:
- Frequent integration — the more often work is integrated to
dev, the smaller the window in which two parallel branches can drift into a semantic conflict. This is one of the strongest arguments for the multi-times-per-day cadence described elsewhere in this standard. - Strong automated checks on the trunk — type-checkers, linters, integration
tests, and full-test-suite runs on every push to
devcatch most semantic conflicts shortly after they’re introduced. - Communication — when work is likely to touch a shared interface (a renamed
function, a changed schema), the team SHOULD coordinate through pair
programming, design notes, or explicit
INCOMPAT-flagged commits (see TS-9: Version Control) so other contributors are aware. - Testing the merged result, not just the source branch — modern PR systems support merge queues that test each change against the latest trunk before integration, surfacing semantic conflicts that would not appear when testing the source branch in isolation.
Maintaining a clean mainline
The mainline (dev, and especially ready) must always be in a releasable
state. Do not use code freezes, all-hands-on-deck swarms, or back-outs to clean
up the mainline before releases. These are symptoms of poor integration
discipline.
If you find yourself in a situation where stories and fixes need to be held and coordinated before release, you are not practicing continuous delivery. Incremental feature development with feature flags enables each story and fix to be independent and releasable on its own merits.
Security
Version control systems form the foundation of the software development lifecycle and contain valuable intellectual property, configuration data, and sometimes sensitive credentials. Securing the repository is therefore critical to the overall security posture of an organization. This section outlines best practices for securing Git repositories and the information they contain, supporting the objectives of quality control and provenance through audit trails and access controls.
Secrets and PII
Secrets, such as access keys, database passwords, API tokens, and encryption keys, and personally identifiable information (PII) MUST NOT be committed to version control.
It is RECOMMENDED to use a dedicated secrets management system to manage secrets and to inject them into applications at runtime — typically as environment variables resolved from the vault by the deployment pipeline or container runtime. Examples of secrets management systems include HashiCorp Vault, AWS Secrets Manager, Azure Key Vault, and 1Password. See also TS-52: Security and Secrets Management and TS-48: Environment Variables.
It is also RECOMMENDED to integrate static analysis tools that check code for
secrets and other security risks. Examples include TruffleHog, and
detect-secrets.
These tools SHOULD run at multiple points in the workflow, defence-in-depth style:
- As a Git pre-commit hook on each developer’s machine, catching secrets before they enter Git history at all. This is the most valuable layer — once a secret reaches even a local commit, recovery is more invasive.
- As part of the CI pipeline on every push, catching anything that bypassed local hooks.
- As a merge gate on protected branches, blocking integration if secrets are detected.
Pre-commit hook configuration (eg. via the pre-commit framework, or husky
for Node.js projects) SHOULD live in the repository so all contributors run the
same checks.
Once secrets have been committed to a branch like dev or test, in which the
commit history is treated as immutable, it can be incredibly difficult to remove
the secret from the repository. Mutating history will often require coordination
among multiple developers, each of whom will have their own clones of the
repository, all of which must be synchronized. Even if the secret is removed
from the latest commit, it will remain in the repository’s history and can be
recovered by anyone with access to the repository.
Once a secret has been committed to version control, even to a temporary branch, the only remedy is to rotate the key or otherwise invalidate the secret. This is why it is so important to avoid committing secrets to version control in the first place.
Commit signing and verification
Commit signing allows you to cryptographically verify the identity of the author
of a commit. Without signing, anyone with access to a repository can create
commits that appear to have been authored by someone else, because the
user.name and user.email values recorded in commits are taken directly from
local Git configuration and are not verified.
It is RECOMMENDED to enable commit signing for all repositories, particularly for open source projects, critical infrastructure, and other contexts where supply chain security is a concern. For closed-source projects where push access is already controlled by authentication mechanisms, commit signing is less critical but still useful for audit trails and regulatory compliance.
Git supports three signing formats: GPG (GNU Privacy Guard), SSH, and X.509. SSH signing is the simplest to set up if you already use SSH keys for Git authentication.
To enable SSH-based commit signing, configure your Git client as described in the Git configuration section.
It is RECOMMENDED to configure your repository hosting provider (GitHub, GitLab, etc.) to require signed commits on protected branches. This ensures that all changes to critical branches have been verified.
Access control
Access to repositories SHOULD be controlled through authentication mechanisms provided by your repository hosting provider. At minimum:
- All developers SHOULD authenticate using SSH keys or personal access tokens, not passwords.
- Personal access tokens SHOULD have minimal required permissions and short expiration windows.
- Inactive accounts and revoked access SHOULD be removed promptly.
SSH versus HTTPS
It is RECOMMENDED to connect to remote Git repositories over SSH rather than HTTPS. Both are secure transport protocols, but public/private key authentication is more convenient and scripts more easily, since it does not depend on Git’s credentials manager to have a password cached. If a private key is compromised, it can simply be revoked, without needing to change an account password.
SSH keys SHOULD generally be passphrase-protected and stored securely. Where a passphrase is impractical — for example, some automation tools and Git clients do not handle passphrase-protected keys well — a passphrase-free key MAY be used instead, provided the private key is kept securely on the client device and is never backed up to a public cloud service. Where supported by the hosting provider, an expiry of up to 12 months SHOULD be applied to keys registered without a passphrase, to limit the exposure window if the device is compromised.
Credentials manager
Git includes a built-in credentials manager that caches usernames and passwords for repositories accessed over HTTPS, via a background daemon process. It is RECOMMENDED to disable the credentials manager, to encourage authentication over SSH instead of HTTPS.
To disable it globally:
git config --global --unset credential.helper
On some Windows installations, this instead requires (run with administrator privileges):
git config --system --unset credential.helper
To disable it for a single repository only, overriding the global setting:
git config credential.helper ""
To fully remove the credentials manager program:
git credential-manager uninstall
Verify there is no credential.helper entry by running git config --list.
For organizations, it is RECOMMENDED to use role-based access control (RBAC) to manage who can perform specific actions:
- Read-only access for viewers (documentation, security researchers, etc.).
- Developer access for those who contribute code.
- Maintainer access for those who review and merge changes.
- Owner/administrator access for those who manage repository settings and access.
It is RECOMMENDED to regularly audit access logs and remove access for developers who are no longer active.
Branch protection
It is RECOMMENDED to configure branch protection rules on all protected
branches, especially the trunks – dev, test, ready, and release. The
goal is to prevent accidental or malicious misuse of the repository, such as
pushing directly to the ready branch or changing the history of the dev
branch.
Branch protection rules are not a feature of Git itself, but rather are a set of access controls provided by most code repository hosting services (GitHub, GitLab, etc.).
Recommended branch protection configurations:
- Require pull request reviews before merge (with a minimum number of approvers).
- Require status checks to pass before merge (eg. CI/CD tests, static analysis). Where the hosting provider supports it, scope expensive or specialized checks to the paths they actually validate (eg. an integration-test suite that only concerns one service) rather than requiring every check on every change. This keeps fast-moving trunks fast without weakening coverage where it matters.
- Require branches to be up-to-date before merge. A strict, unconditional version of this rule forces repeated re-validation on every change queued behind a slow-moving PR. Where the hosting provider supports it, a bounded staleness window (eg. only re-validate if the target branch has moved in the last few hours) is an acceptable middle ground between safety and CI load.
- Require signed commits.
- Require all pull request review comments to be marked resolved before merge. A reviewer can raise a blocking concern in a comment without formally rejecting the PR; without this check, that comment can be silently overlooked at merge time.
- Dismiss stale pull request approvals when new commits are pushed.
- Restrict who can push to the branch (eg. administrators only).
- Prevent force pushes and deletions.
These protections help ensure that only reviewed, tested, and verified changes reach stable branches.
Typically, the dev branch should have relatively permissive write access to
enable continuous integration and rapid feedback. However, in certain
contexts—very large teams, open source projects with many contributors, or
organizations with strict governance requirements—you may choose to restrict
direct write access to dev and require all changes to flow through pull
requests. This increases oversight but may slow integration velocity. The
tradeoff should be evaluated based on your team size, risk tolerance, and
governance requirements.
Audit and accountability
A well-maintained commit history serves as an audit trail of all changes to the codebase, directly supporting the objective of provenance. To support auditing and accountability:
- Commit authors SHOULD be verified through signed commits and matched to known individuals.
- Commit messages SHOULD include cross-references to issues, pull requests, or other tracking systems that document the rationale for changes.
- Access logs and change logs SHOULD be regularly reviewed and retained for the duration required by organizational policy or regulatory requirements.
- Sensitive operations (such as force pushes, branch deletions, or access changes) SHOULD trigger alerts and be logged for review.
Dependency security
When dependencies are managed within a repository (eg. via package managers, submodules, or vendor directories), it is RECOMMENDED to:
- Keep dependencies up-to-date and patch known vulnerabilities promptly.
- Integrate dependency scanning tools into the CI/CD pipeline to detect vulnerable dependencies.
- Enable hosting-provider security alerts (eg. GitHub Dependabot alerts, GitLab security dashboards) so vulnerabilities are flagged automatically as they are disclosed upstream.
- Use dependency lock files (eg.
package-lock.json,poetry.lock,Cargo.lock) to ensure reproducible builds and to control when dependencies are updated. Lock files MUST be committed to version control. - Review and approve dependency updates before merging them to protected branches.
Repository backups
While Git’s distributed nature means every clone contains a full copy of the repository history, it is RECOMMENDED to maintain regular backups of the reference repository. This protects against:
- Accidental or malicious deletion of the repository.
- Corruption of the repository on the hosting provider.
- Loss of access to the hosting provider (eg. account compromise).
Backups SHOULD be stored in a geographically distinct location and SHOULD be tested periodically to ensure they can be restored.
Miscellaneous guidelines
Symlinks
Git stores symlinks as a special object type where the content is just the path
string. When you git add a symlink, Git records the path reference, not the
contents of the file it targets. The target isn’t followed.
Committed symlinks MUST NOT point to paths outside of the repository.
Committed symlinks MUST be relative paths, not absolute ones.
../config/prod.yaml travels better than /home/user/project/config/prod.yaml.
Even following these rules, symlinks can still cause incompatibility issues in
different environments. For example, symlinks in Windows historically required
admin rights or "developer mode", while Git for Windows has a core.symlinks
setting that defaults to false in some installs, which causes the symlinks to be
checked out as plain text files. For these reasons, it is best to avoid
committing symlinks at all.
Repository maintenance
A local clone accumulates cruft over time: loose objects from rebases and
amends that are no longer reachable from any branch or tag, stale remote-tracking
references for branches deleted upstream, and – rarely – object corruption from
disk faults or interrupted operations. This is independent of the repository
history itself, which stays clean under the fix-forward discipline described
elsewhere in this standard; it concerns the health of the local .git directory.
It is RECOMMENDED to periodically run the following maintenance commands on long-lived clones, particularly ones used for day-to-day development on a repository with heavy commit and branch-deletion activity:
git gc
git remote prune origin
git fsck
git-gc(1) compacts loose objects into packfiles and removes objects that are
no longer reachable, once they age past the default retention window. This
keeps clone and fetch operations fast and the on-disk repository small.
git remote prune origin (equivalently, git fetch --prune) removes
remote-tracking references for branches that have been deleted on the remote,
which otherwise accumulate indefinitely and clutter output like
git branch -r. git-fsck(1) verifies the integrity of the object database
and reports any corruption, which is otherwise likely to go unnoticed until a
corrupted object is actually read.
None of these commands alter recorded history; they are housekeeping only.
Most Git installations since v2.x run a lightweight form of git gc
automatically in the background after operations like commit and merge, so
manual invocation is mostly useful for git fsck (which is not run
automatically) and for forcing cleanup on repositories where the automatic
trigger’s heuristics have not kicked in.
References
- Chacon, S; Straub, B. Pro Git: Distributed Workflows. — Describes three repository-topology patterns for distributed collaboration – centralized, integration-manager (fork-and-pull), and dictator-and-lieutenants (hierarchical, for very large projects) – which are a distinct concern from the branch-naming-and-merging strategies covered by the other references below.
- Hintjens, P (2016).
The Collective Code Construction Contract (C4).
— A formal specification, rather than a descriptive pattern, for fork-and-pull
contribution: a single
mainbranch with no topic branches, mandatory pull requests reviewed by maintainers, and a prescribed patch and commit message format. - Microsoft (2022).
How Microsoft Develops with DevOps.
— Describes the "Microsoft Release Flow": trunk-based development with
short-lived topic branches merged into
mainvia pull request, and periodic release branches cut frommainthat never merge back. Hotfixes are made inmainfirst, then cherry-picked forward into affected release branches – the same fix-forward discipline this technical standard requires. - Li, J (2019).
Successfully Merging the Work of 1000+ Developers.
— A case study of merge-queue infrastructure at scale: pull requests are
batched, tested against a "predictive branch" ahead of
master, and merged automatically once checks pass, with tolerance thresholds to stop flaky tests from blocking the queue. Directly relevant to the merge-queue technique noted in TS-9: Version Control for catching semantic conflicts before they reach the trunk. - Driessen, V (2010).
A Successful Git Branching Model (GitFlow).
— This branching-and-merging strategy was designed for the intermittent
release of versioned software. It is characterized by its two main branches,
masteranddevelop. GitFlow was not intended for continuously delivered, singly versioned software like web apps, though it has been widely adopted for that purpose. - GitLab (2014). GitLab Flow. — This workflow offers a better template for the source code management of continuously delivered web-based software systems.
- GitLab. What is GitLab Flow?. — GitLab’s current explainer of the same workflow introduced in the 2014 post above, covering its integration with issue tracking and continuous delivery.
- Chacon, S (2011).
GitHub Flow. — A
minimalist workflow, ideal for personal and small open source projects. It
uses a single
mainbranch, and feature branches are created for each new feature or bug fix. - GitHub. GitHub Flow. — GitHub’s current documentation of the same workflow described in Chacon’s original post above.
- Atlassian. Simple Git Workflow. — This uses feature branches but with the rebase strategy suggested for integrations back to the main branch. It also adds environment branches and release branches.
- Ruka, A (2017).
OneFlow – a Git Branching Model and Workflow.
— A simplified alternative to GitFlow that uses a single eternal branch,
replacing GitFlow’s
develop,release, andhotfixbranches with short-lived support branches and Git tags. - Spiewak, D.
Git DMZ Flow. — A
workflow built around a single "demilitarized zone" integration branch that
automatically validates changes via CI before they reach a pristine,
always-deployable
master. - Ellerby, B (2020). Serverless Flow: A CI/CD Branching Workflow Optimized for Speed and Quality. — A GitHub Flow variant for serverless architectures, using ephemeral per-branch environments to test changes in isolation before they reach production.
- Wilsenach, R (2021). Ship / Show / Ask. — A workflow that classifies each change by review posture – ship without review, show for asynchronous feedback after merging, or ask for review before merging – rather than applying the same review gate to every change.
- Trunk-Based Development. — This workflow
utilizes a single branch called
trunk, to which all developers continuously integrate their changes, while resisting the temptation to create any other long-lived branches. - Atlassian. Comparing Git Workflows. — A good overview of the main design choices to be made when establishing a Git workflow.
- Precht, P. REBASE: The Complete Guide on Rebasing in Git. — A book-length treatment of rebasing mechanics, from simple and interactive rebasing to cherry-picking and practical workflows, complementing the rebase-up and merge-down sync strategies described in TS-9: Version Control.
- Submitting Patches. — Guidelines for writing commit messages for patches to the Git project itself, and which form the basis for most commit conventions, including Conventional Commits.
- Conventional Commits. — A widely-adopted standard for writing commit messages, from which changelogs can be auto-generated.
- Angular. Commit Message Guidelines. — The inspiration for Conventional Commits.
- Wiggins, A (2017). The Twelve-Factor App. — Factor I (Codebase) states that a single codebase, tracked in version control, deploys to multiple environments, with one-to-one correspondence between codebase and app — directly relevant to the single-reference-repository and self-contained-repository principles in TS-9: Version Control.